Présentation de l'outil
L’outil Cycles de vie permet de visualiser et construire un cycle de vie.
L'outil Cycle de vie est disponible à partir de la version 4.8

Il existe plusieurs types de cycles de vies:
- les cycles de vies système qui sont utilisés par défaut dans Ametys
- les cycles de vies utilisateurs qui sont des cycles de vies créés par les utilisateurs et qui sont essentiellement à destination des formulaires.
Pour avoir accès au bouton "Cycles de vie", l'utilisateur doit posséder le droit "Voir tous les cycles de vie" (pour visualiser la totalité des cycles de vie) ou "Voir les cycles de vie utilisateur" (pour visualiser uniquement les cycles de vie créés par un utilisateur)
L’outil s’affiche de cette façon :
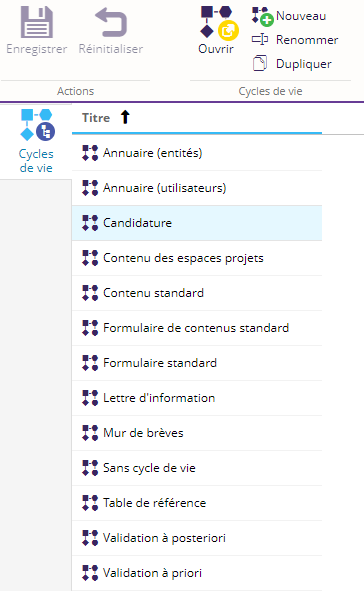
- La colonne “Identifiant” est cachée par défaut, elle affiche l’identifiant du cycle de vie qui doit être unique.
- Le bouton “Enregistrer” permet de sauvegarder les modifications faites à un cycle de vie.
Pour avoir accès aux fonctionnalités de création, modification, duplication et d'enregistrement, l'utilisateur doit posséder le droit "Gérer tous les cycles de vie" (pour modifier la totalité des cycles de vie) ou "Gérer les cycles de vie utilisateur" (pour modifier uniquement les cycles de vie créés par un utilisateur)
- Le bouton ”Réinitialiser” sert à supprimer tous les changements effectués depuis la dernière sauvegarde.
- Le bouton “Ouvrir” permet d’afficher un graphique représentant le cycle de vie en détail et permet de modifier le cycle de vie lorsqu’on en a le droit.
- Le bouton “Nouveau” sert à créer un nouveau cycle de vie.
- Le bouton “Renommer” permet de changer le libellé du cycle de vie sélectionné, ce libellé apparaît dans les menus permettant de choisir un cycle de vie pour un élément.
- Le bouton "Dupliquer" permet de dupliquer un cycle de vie existant.
Création d’un nouveau cycle de vie:

Pour créer un nouveau cycle de vie, il faut cliquer sur le bouton “Nouveau”.
Une boîte de dialogue apparaît, dans laquelle il faut saisir le libellé et l’identifiant du nouveau cycle de vie.

L’identifiant accepte seulement des caractères alphanumériques et le tiret “-”.
Pour créer un cycle de vie à destination des formulaires l’identifiant doit commencer par “entry-form-”
Un cycle de vie contenant des changements apparaîtra avec un bandeau rouge. Il faut enregistrer ces changements pour qu’ils s’appliquent définitivement et donc pouvoir utiliser le cycle de vie.
Attention ces changements ne pourront être enregistrés que lorsque le cycle de vie sera valide, c'est-à-dire utilisable par Ametys. Un message d’erreur apparaîtra dans le cas contraire et la sauvegarde ne se fera pas.

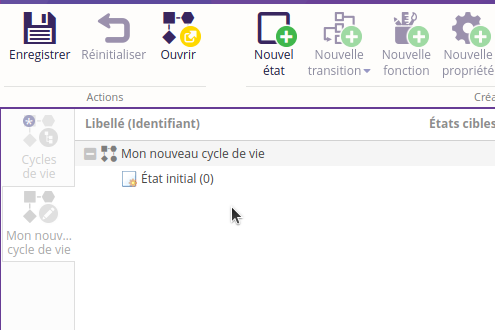
Lorsque le nouveau cycle de vie est créé, il apparaît avec un état initial. Cet état est fictif et sert de départ pour les transitions initiales.
- La première chose à faire avec un nouveau cycle de vie est d’ajouter des états grâce au bouton Nouvel état.
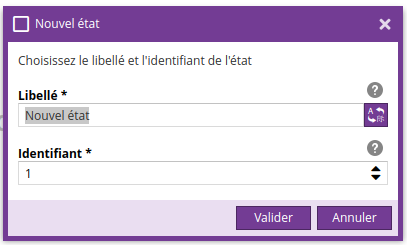 L’identifiant doit être un nombre entier unique parmi les autres États. Le libellé peut être traduit en plusieurs langues.
 - Une fois qu’il y a plusieurs états, il est possible de créer des transitions. Les transitions permettent de passer à un nouvel état du cycle.
Il faut au moins une transition qui parte de l’état initial afin de faire débuter le cycle, et chaque état doit être rejoint par une transition.
Transitions
Pour créer une transition qui part d’un état, il faut sélectionner l’état et utiliser le bouton Nouvelle transition:

Comme pour les états, l’identifiant est un nombre entier unique parmi les transitions et le libellé est traduisible en plusieurs langues.
L’état cible correspond à l’état d’arrivée par défaut de la transition, les options correspondent à tous les états du cycle ainsi que l’option “même état”.
Une transition peut être ajoutée à plusieurs états différents, il faut donc bien réfléchir à l’état cible par défaut. L'ajout de plusieurs états cibles conditionnels à une même transition est décrit ci-dessous.
Si l'utilisateur a créé une transition qu’on veut faire partir de plusieurs états, il a la possibilité de les ajouter en passant par le menu de Nouvelle transition:
Une boîte de dialogue proposera alors les transitions disponibles à l’ajout sur l’état sélectionné, il est possible d’ajouter plusieurs transitions d’un coup:

Fonctions
Les fonctions sont des actions qui s’exécutent à différents moments du cycle:
- dans le cas des fonctions appliquées à une transition, soit elles s’exécutent avant de changer d’état soit après être arrivé à l’état cible
- dans le cas des fonctions appliquées à un état, soit la fonction s’exécute avant d’arriver dans cet état, sans tenir compte par quelle transition elle passe, soit elle s'exécute en sortant de l'état;
Dans la plupart des cas les fonctions ont déjà un ordre d'exécution prédéfini, il faut en tenir compte pour savoir si celle-ci doit être ajoutée plutôt à une transition ou à un état
Les fonctions s'exécutent dans l’ordre dans lequel elles sont affichées dans la grille des actions (la première en haut de la liste), il est possible de changer cet ordre avec les boutons avancer et reculer.
Une fonction peut être ajoutée en cliquant sur le bouton “Nouvelle fonction “
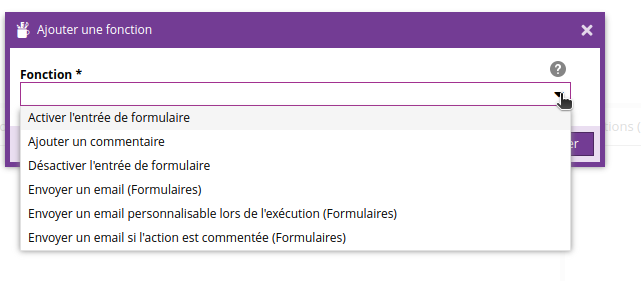
La boîte de dialogue permet de sélectionner l’action à exécuter.
Pour les cycles de vie utilisateur la liste est réduite.
A la sélection de la fonction il est possible que des champs de paramètres apparaissent.
Fonctions utilisateur
- Activer / Désactiver l’entrée de formulaire
- Ajouter un commentaire
Cette fonction est à coupler avec la propriété “need-comment” et permet de stocker le commentaire dans JCR.
- Envoyer un email (Formulaires)
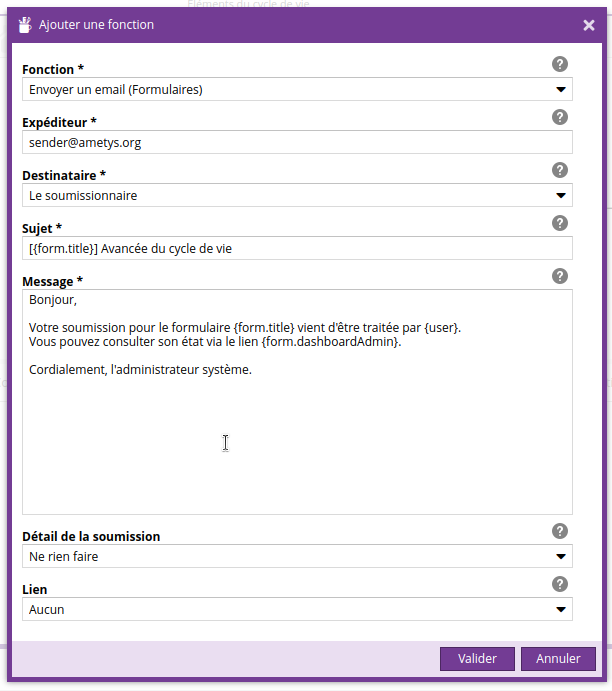
Cette fonction permet de configurer un email à envoyer lors de la transition / l’état elle attend donc plusieurs paramètres:
-
- Expéditeur: il faut saisir l’adresse mail de l’expéditeur du mail
- Destinataire: ce champ a plusieurs options possibles
- Le soumissionnaire : l’email sera envoyé au soumissionnaire de l’entrée
- Les utilisateurs appartenant à un groupe: permet de sélectionner un groupe d’utilisateur parmi ceux disponibles dans les populations du site. L’email sera envoyé à l’ensemble des utilisateurs du groupe.
- Les utilisateurs ayant un ou plusieurs droit(s): permet de sélectionner un ou plusieurs droits. L’email sera envoyé aux utilisateurs en possession de l’ensemble de ces droits.
-
-
- Saisie manuelle: permet d’entrer des adresses email à la main. Il est possible d’utiliser des variables de la forme {x} qui sont indiquées dans la description du champ. Par exemple, pour récupérer l’adresse email saisie dans le champ texte “txt” d’un formulaire: il faut saisir {entry.txt} dans le champ “Insérer les adresses email”.
-
-
- Sujet: le sujet de l’email, il est également possible d'insérer des variables dans ce champ.
- Corps: le contenu de l’email, il est possible d'y insérer des variables
- Afficher le détail de la réponse: détermine siles valeurs entrées par le soumissionnaire sont insérées dans le corps de l’email, les options sont :
- ne rien afficher
- afficher les données visibles par le soumissionnaire: certains champs de formulaires peuvent avoir une visibilité restreinte, en sélectionnant cette option les valeurs affichées seront celles des champs visibles par un soumissionnaire
- insérer toutes les données
- lien: permet d’insérer un lien parmis la liste déroulante en fin de mail
- envoyer si commentaire présent: ce paramètre est utile lorsque l’élément de cycle de vie contient la propriété “need-comment”: si ce paramètre est valué à “oui”, l’email ne s’enverra que si la personne faisant avancer le cycle de vie aura saisi un commentaire.
- Envoyer un email personnalisable lors de l'exécution (Formulaires) : cette fonction permet d’envoyer un mail dont le contenu est saisi lors de l’avancement du cycle de vie
Conditions
Les conditions servent à restreindre l’utilisation d’une transition.
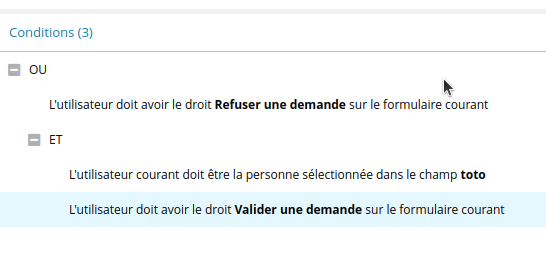
Pour utiliser les conditions il y a 2 types d'éléments:
- les opérateurs servent à définir les relations entre les conditions qu’ils englobent

- ET : toutes les conditions situées sous cet opérateur devront être validées pour que la transition s’exécute
- OU: il suffit qu’une seule condition située sous cet opérateur soit valide pour que l’opérateur soit valide
- les conditions: ce qui doit être validé
Dans l’exemple ci dessus, un opérateur OU est présent à la racine de l’arbre:
pour que la transition s’exécute il faut donc que l’utilisateur ait le droit “Ajouter un contenu” ou de créer le contenu ou que le contenu courant soit à l’utilisateur et qu’il ne soit pas verrouillé.
Par défaut les conditions créées à la racine de l’arbre seront liées par une condition ET.
L’ajout d’une condition se fait avec le bouton Nouvelle condition :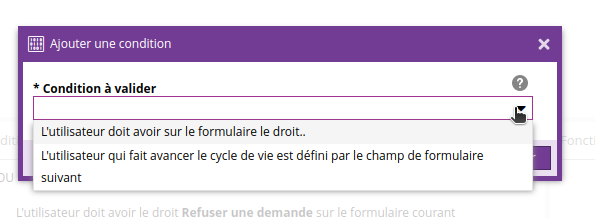
Comme pour les fonctions, à la sélection d’une condition, les champs de paramètres liés apparaîtront.
Lorsque rien n’est sélectionné, les nouveaux éléments ajoutés seront ajoutés sous l’opérateur racine. Sinon, les éléments sont ajoutés sous la sélection.
Dans le cas où la racine n’est pas visible (opérateur ET), qu’une condition est sélectionnée et qu’on veut ajouter un élément à la racine, il suffit de cliquer sur l’élément sélectionné pour le désélectionner puis d’ajouter le nouvel élément.
Avant de sauvegarder il faut vérifier qu'il n’y a pas d’opérateur sans condition en dessous.
États cibles conditionnels
Les états cibles sont les états d’arrivée après une transition, il y en a 2 types:
- l’état cible inconditionnel: il est défini en même temps que la transition car c’est l’état dans lequel finira la transition si les conditions ne sont pas validés pour les autres états cibles
- les états cibles conditionnels sont des états vers dans lesquels peuvent finir une transition si certaines conditions sont remplies
Pour ajouter un état cible conditionnel, il faut sélectionner une transition dans l’arbre de gauche puis cliquer sur Nouvel état cible conditionnel, les états disponibles s’afficheront. Si l’option “même état” est choisie, la transition bouclera sur le même état quel que soit son état d’origine.
Comme son nom l’indique un état cible attend des conditions, elles fonctionnent de la même façon que les conditions pour une transition. La différence est qu’il faut sélectionner un état cible conditionnel (ou un élément enfant) avant de cliquer sur le bouton sinon l’ajout se fera dans la colonne des conditions.
Attention, si un état cible conditionnel n’a pas de conditions, la sauvegarde ne pourra pas se faire.
Propriétés
Les propriétés sont des variables qui sont forcément associées à un développement supplémentaire pour les utiliser.
Une propriété a un nom unique au sein d’un même élément (on ne peut pas avoir deux propriétés nommées “status” dans la transition Modifier).
Dans le cas des cycles de vie de formulaires, il y a des propriétés noyaux associées:
- status: propriété qui permet d’afficher des icônes plus parlantes côté tableau de bord. Les valeurs possibles sont les suivantes:
- pour des actions:
- accept: pour une action de validation
- refuse: pour une action de refus
- need-complements: pour une action intermédiaire qui necessite un retour de l’utilisateur
- pour des états
- accepted: pour l’état validant
- proposed: pour l’état en attente de traitement
- refused: pour l’état refusé
- incomplete: lorsque le formulaire est en attente de complément
- pour des actions:
- action-type: propriété qui permet d’effectuer des actions en plus lors du changement d’état. Les valeurs sont:
- need-comment: permet de saisir un commentaire à insérer dans un email
- send-mail: permet d’envoyer un email à configurer
Dupliquer un cycle de vie
L'accès à la duplication de cycle de vie est lié au droit "Gérer tous les cycles de vie" ou "Gérer les cycles de vie utilisateur" (en fonction du type de cycle de vie à dupliquer)
Après sélection d'un cycle de vie existant, un clic sur le bouton Dupliquer ouvre la fenêtre suivante afin de choisir le libellé ainsi que l'identifiant du cycle de vie dupliqué.

Après clic sur Valider, un nouveau cycle de vie est disponible copie du cycle de vie initial.