Introduction
Une population d'utilisateurs est le regroupement de répertoires d'utilisateurs issus de différentes sources de données (LDAP, SQL...) avec les méthodes utilisées pour les identifier.
Par exemple, utilisateurs issus d'un LDAP et identifiés via CAS.
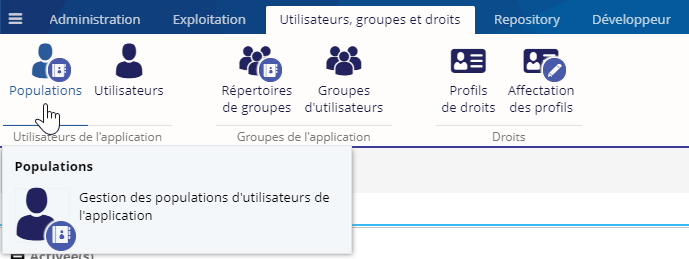
Afficher les populations d'utilisateurs
Dans l'onglet Utilisateurs, groupes et droits, cliquez sur le bouton Populations :
L'outil Populations s'ouvre. Vous trouverez la liste des populations déjà créées :

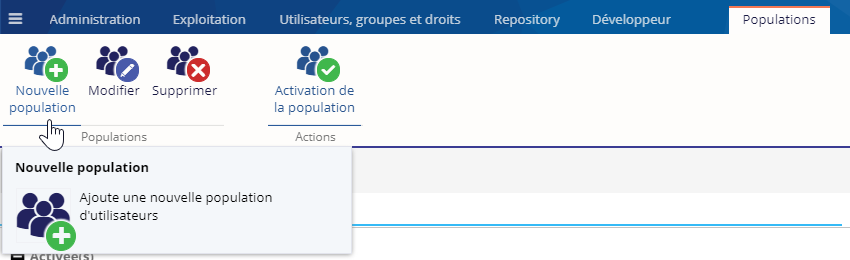
Ajouter une population
Pour ajouter une population, cliquez sur le bouton Nouvelle population de l'onglet Populations :
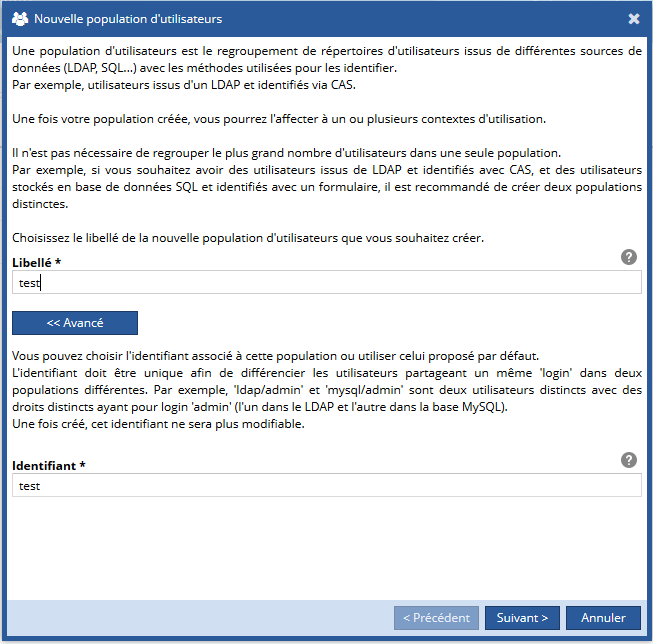
Une boîte de dialogue s'affiche pour vous permettre de paramétrer votre population étape par étape.
Vous devez d'abord choisir un libellé pour la nouvelle population. Vous pouvez également choisir un identifiant différent du libellé en cliquant sur le bouton Avancé :

Cliquez sur le bouton Suivant. Vous devez désormais paramétrer le ou les répertoires d'utilisateurs qui composeront votre population. En fonction du type de répertoire, les paramètres à renseigner peuvent être différents :
|
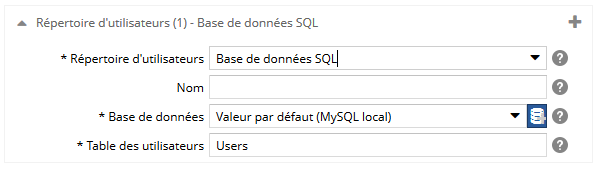
Pour un répertoire d'utilisateurs de type Base de données SQL, spécifiez :
- le nom du répertoire d'utilisateurs. Si il y a plusieurs fois le même type de répertoire d'utilisateurs, ce libellé sera utilisé pour les différencier. Il sera visible dans l'espace d'administration et dans le back-office,
- la base de données à utiliser,
- le nom de la table contenant les utilisateurs.
Vous pouvez créer le lien à la base de données à la volée en cliquant sur le bouton  . Plus d'informations sur les sources de données ici. . Plus d'informations sur les sources de données ici.
|

|
|
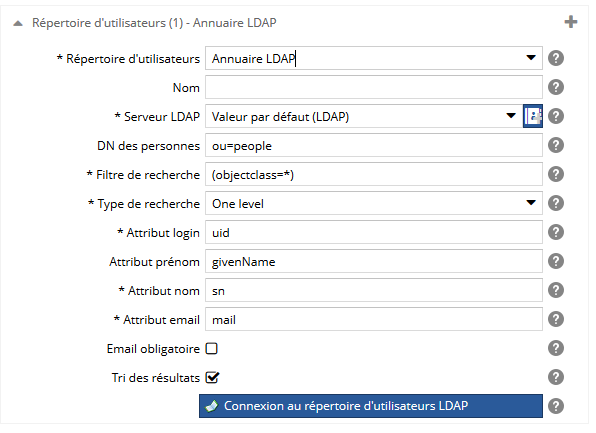
Pour un répertoire d'utilisateurs de type Annuaire LDAP, spécifiez :
- le nom du répertoire d'utilisateurs. Si il y a plusieurs fois le même type de répertoire d'utilisateurs, ce libellé sera utilisé pour les différencier. Il sera visible dans l'espace d'administration et dans le back-office,
- le serveur LDAP à utiliser,
- le DN relatif de la branche des personnes,
- un filtre pour la recherche des utilisateurs dans l'annuaire LDAP,
- le type de recherche possible dans l'annuaire LDAP (peut être Object, One level ou Sub tree),
- le nom de l'attribut contenant l'identifiant de l'utilisateur dans l'objet de la recherche,
- le nom de l'attribut contenant le prénom de l'utilisateur dans l'objet de la recherche,
- le nom de l'attribut contenant le nom de l'utilisateur dans l'objet de la recherche,
- le nom de l'attribut contenant l'email de l'utilisateur dans l'objet de la recherche,
- si l'attribut email est obligatoire,
- si les utilisateurs doivent être triés dans les résultats de recherche (par nom puis prénom). Décochez cette option si la recherche d'utilisateur est très lente.
Vous pouvez créer le lien à l'annuaire LDAP à la volée en cliquant sur le bouton  . Plus d'informations sur les sources de données ici. . Plus d'informations sur les sources de données ici.
|

|
|
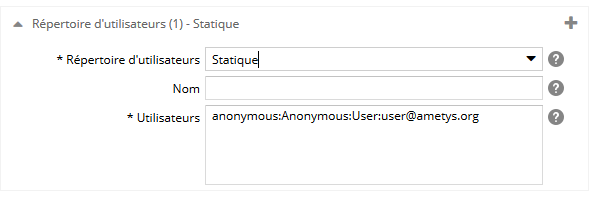
Pour un répertoire d'utilisateurs de type Statique, spécifiez :
- le nom du répertoire d'utilisateurs. Si il y a plusieurs fois le même type de répertoire d'utilisateurs, ce libellé sera utilisé pour les différencier. Il sera visible dans l'espace d'administration et dans le back-office,
- les utilisateurs qui seront utilisés de manière statique. Renseignez un utilisateur par ligne, selon le format login:nom:prénom:email. Seul le login est obligatoire.
|

|
|
Pour le mode EntraID, spécifiez :
- le nom du mode d'identification. Si il y a plusieurs fois le même mode d'identification, ce libellé sera utilisé pour les différencier. Attention ! il sera visible dans l'espace d'administration, dans le back-office, mais aussi sur les écrans de connexion (précédé de la mention 'Se connecter par'),
- L'identifiant de l'application obtenu lors de l'enregistrement de l'application dans EntraID
Lors de l'enregistrement de l'application dans EntraID, vous devrez configurer le fournisseur d'identité en indiquant les URI de redirections, les scopes permettant l'accès à l'email, le nom et le prénom.
Vous obtiendrez un ID client et un code secret.
Les URI de redirection Ametys sont :
- <BOserver_url>/_extra-user-management/oidc-callback (<BOserver_url> par ex: https://cms.mywebsite.com ou https://www.mywebsite.com/cms)
- <SITEserver_url>/_extra-user-management/oidc-callback (À saisir plusieurs fois si vous utilisez plusieurs url racines comme https://www.mywebsite.com et https://www.otherwebsite.com)
- L'identifiant du locataire "Tenant" qui identifie l'organisation
- La clef secrète liée à l'application
- Un filtre si vous ne souhaitez remonter que certains utilisateurs (Syntaxe OData 4.0)
|

|
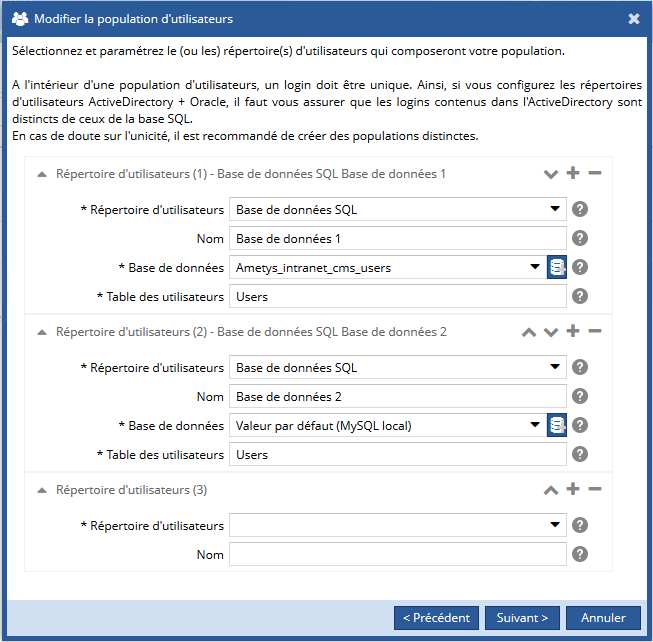
Pour paramétrer plusieurs répertoires d'utilisateurs, cliquer sur le bouton  :
:
Attention, comme indiqué dans la boîte de dialogue ci-contre, un login doit être unique à l'intérieur d'une population d'utilisateurs. Si vous utilisez plusieurs répertoires, il faut vous assurer que les logins n'apparaissent pas dans plusieurs de ces répertoires.
En cas de doute sur l'unicité, il est recommandé de créer des populations distinctes.
Une fois les répertoires paramétrés, cliquez sur le bouton Suivant, puis paramétrez le ou les modes d'identification des utilisateurs.
En fonction du mode d'identification, les paramètres à renseigner peuvent être différents :
|
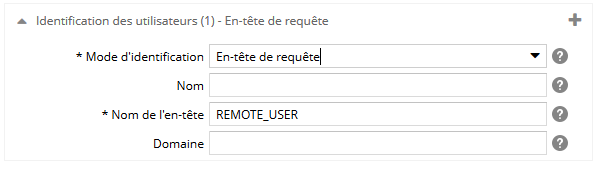
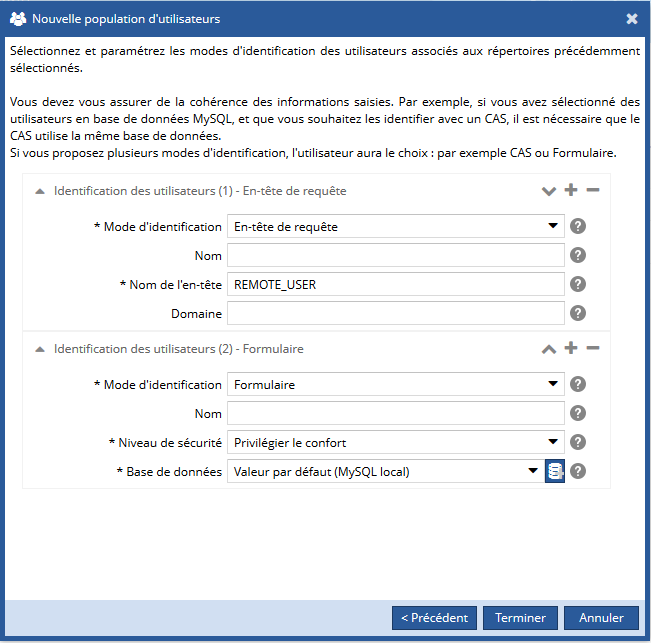
Pour le mode en-tête de requête, spécifiez :
- le nom du mode d'identification. Si il y a plusieurs fois le même mode d'identification, ce libellé sera utilisé pour les différencier. Attention ! il sera visible dans l'espace d'administration, dans le back-office, mais aussi sur les écrans de connexion (précédé de la mention 'Se connecter par')
- la valeur de l'en-tête de requête où se trouve l'utilisateur,
- la valeur par laquelle les domaines sont préfixés.
|

|
|
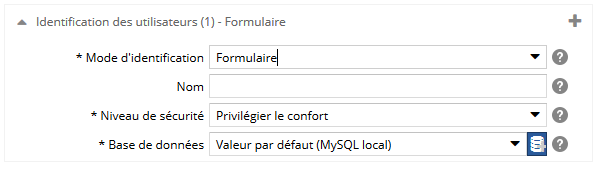
Pour le mode formulaire, spécifiez :
- le nom du mode d'identification. Si il y a plusieurs fois le même mode d'identification, ce libellé sera utilisé pour les différencier. Attention ! il sera visible dans l'espace d'administration, dans le back-office, mais aussi sur les écrans de connexion (précédé de la mention 'Se connecter par')
- le niveau de sécurité du formulaire de connexion au CMS :
- Privilégier le confort : autocomplétion des champs du formulaire, mémorisation du mot de passe
- Privilégier la sécurité : pas mémorisation du mot de passe, protection par un captcha
- la base de données qui va stocker les cookies de reconnexion ou le nombre d'échec de connexion selon le niveau de sécurité choisi.
Vous pouvez créer le lien à la base de données à la volée en cliquant sur le bouton . Plus d'informations sur les sources de données ici.
|
|
|
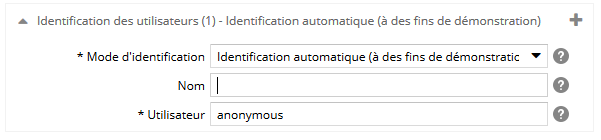
Pour le mode d'identification automatique, spécifiez :
- le nom du mode d'identification. Si il y a plusieurs fois le même mode d'identification, ce libellé sera utilisé pour les différencier. Attention ! il sera visible dans l'espace d'administration, dans le back-office, mais aussi sur les écrans de connexion (précédé de la mention 'Se connecter par'),
- Le login de l'utilisateur.
|
|
|
Pour le mode kerberos, spécifiez :
- le nom du mode d'identification. Si il y a plusieurs fois le même mode d'identification, ce libellé sera utilisé pour les différencier. Attention ! il sera visible dans l'espace d'administration, dans le back-office, mais aussi sur les écrans de connexion (précédé de la mention 'Se connecter par'),
- l'adresse IP ou le nom de domaine permettant de contacter le KDC (Key Distribution Center),
- le domaine des utilisateurs sur le KDC,
- le login de l'utilisateur Ametys autorisé sur l'Active Directory,
- le mot de passe de l'utilisateur Ametys autorisé sur l'Active Directory,
- une expression régulière listant les adresses IP autorisées à utiliser cette authentification. Si le serveur n'est pas dans la liste des sites web 'trusted' du client, l'authentification HTTP peut afficher une fenêtre de connexion et cela rend ce processus non-transparent. Il est donc vivement recommandé de restreindre l'utilisation de cette authentification aux adresses IP dont la configuration des navigateurs clients est maîtrisée (en général cela concerne les machines du réseau interne). Exemples :
- ^172\..*$ : accepte toutes les adresses commençant par '172.'
- (^172\..*$)|(^168\..*$)|(^127\.0\.0\.1$) : accepte toutes les adresses commençant par '172.' ou '168.' ainsi que '127.0.0.1'.
|

|
|
Pour le mode popup navigateur, spécifiez :
- le nom du mode d'identification. Si il y a plusieurs fois le même mode d'identification, ce libellé sera utilisé pour les différencier. Attention ! il sera visible dans l'espace d'administration, dans le back-office, mais aussi sur les écrans de connexion (précédé de la mention 'Se connecter par'),
- le nom du domaine (ou 'Realm') d'authentification.
|

|
|
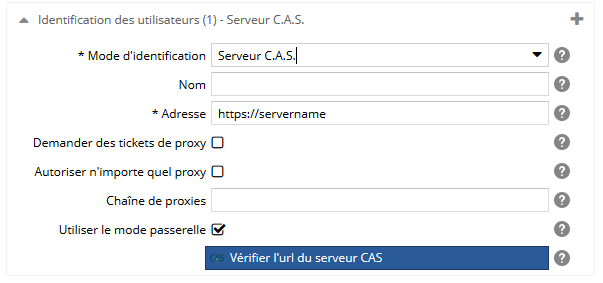
Pour le mode serveur C.A.S., spécifiez :
- le nom du mode d'identification. Si il y a plusieurs fois le même mode d'identification, ce libellé sera utilisé pour les différencier. Attention ! il sera visible dans l'espace d'administration, dans le back-office, mais aussi sur les écrans de connexion (précédé de la mention 'Se connecter par'),
- l'URL du serveur C.A.S.
- si vous souhaitez demander des "Proxy-Tickets" (PT),
- si vous souhaitez autoriser n'importe quel proxy. Si c'est le cas, la chaîne de serveurs proxy autorisée sera ignorée,
- la chaîne de serveurs proxy autorisée par C.A.S.,
- si vous souhaitez activer le mode passerelle. Lorsque le mode 'gateway' est activé, un utilisateur déjà connecté au C.A.S. sera connecté à Ametys de manière transparente. Si l'url C.A.S. n'est pas accessible par tous les utilisateurs devant se connecter à Ametys (sur un intranet par exemple), il convient de désactiver ce mode qui pourrait les empécher d'accéder à l'écran d'authentification (code d'erreur 404 ou 403)
Le bouton Vérifier l'url du serveur CAS permet de vérifier que le l'URL spécifiée est valide en essayant d'établir une connexion.
|

|
|
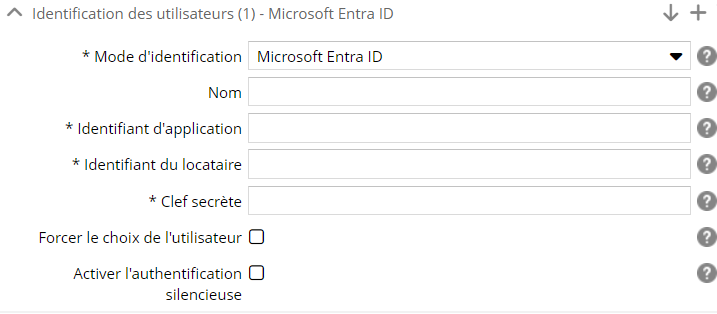
Pour le mode EntraID, spécifiez :
- le nom du mode d'identification. Si il y a plusieurs fois le même mode d'identification, ce libellé sera utilisé pour les différencier. Attention ! il sera visible dans l'espace d'administration, dans le back-office, mais aussi sur les écrans de connexion (précédé de la mention 'Se connecter par'),
- L'identifiant de l'application obtenu lors de l'enregistrement de l'application dans EntraID,
- L'identifiant du locataire "Tenant" qui identifie l'organisation,
- La clef secrète liée à l'application,
- Si vous souhaitez forcer le mécanisme d'authentification à afficher la boite de dialogue de choix de l'utilisateur,
- Si vous souhaitez activer l'authentification silencieuse.
|
|
Pour paramétrer plusieurs modes d'identification, cliquer sur le bouton :
Cliquez sur le bouton Terminer, votre population est créée et vous la retrouvez dans la liste de l'outil Populations.
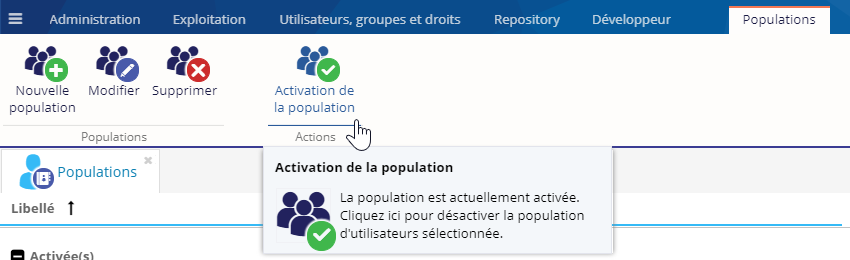
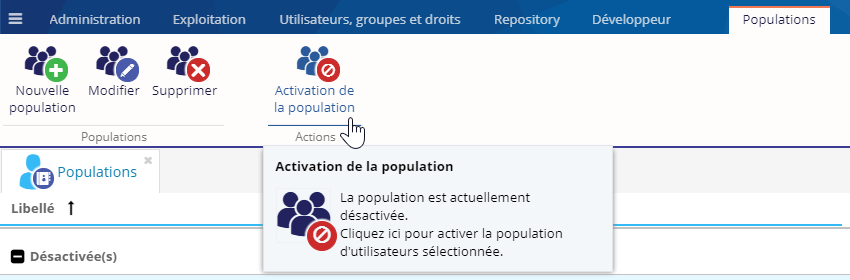
Activer une population
Lorsque vous créez une population, elle est activée automatiquement. Dans l'outil Populations, vous pouvez voir les populations activées et désactivées :

Pour activer ou désactiver une population, sélectionnez-la dans la liste puis cliquez sur le bouton Activation de la population :
Bouton Activation de la population si la population sélectionnée est active :
Bouton Activation de la population si la population sélectionnée n'est pas active :
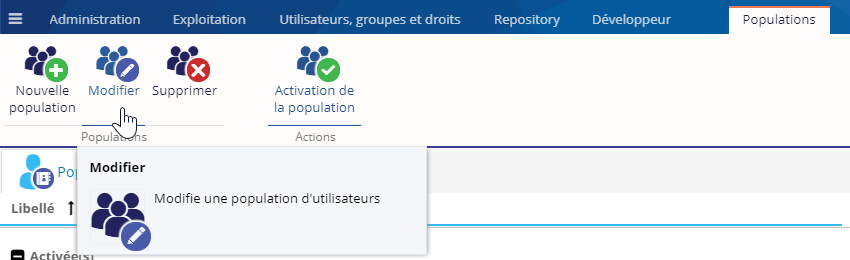
Modifier une population
Pour modifier une population, sélectionnez-la dans la liste puis cliquez sur le bouton Modifier :
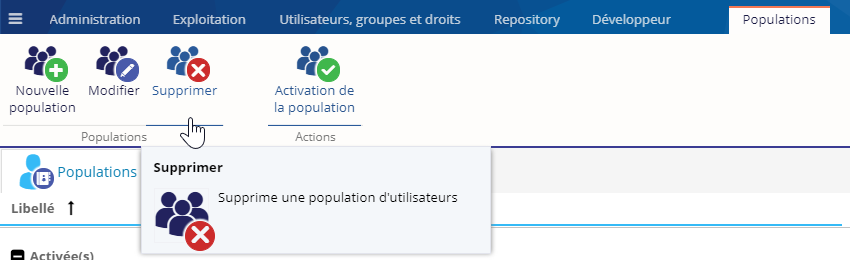
Supprimer une population
Il est également possible de supprimer une population, uniquement si celle ci n'est utilisée par aucun site.
Sélectionnez la population dans la liste, puis cliquez sur le bouton Supprimer :
Une fenêtre contextuelle de confirmation est affichée afin de confirmer votre choix.