Les fonctionnalités décrites dans cette page font parties du Plugin Enquêtes en ligne (installé par défaut dans l'application de démonstration Ametys).
Le plugin Enquêtes en ligne fournit un outil back-office pour la gestion des enquêtes.
- Outil "Enquêtes en lignes"
- Création d'une enquête
- Étape 1: nouvelle enquête
- Étape 2: les pages de l'enquête
- Etape 3: les questions
- Étape 4: Prévisualisation de l'enquête
- Étape 5: Les branches (optionnelles)
- Étape 6: Validation de l'enquête
- Étape 7: Limiter l'accès de l'enquête
- Étape 8: Publication de l'enquête
- Étape 9: Programmer l'ouverture d'une enquête
- Consultations et exploitation des résultats
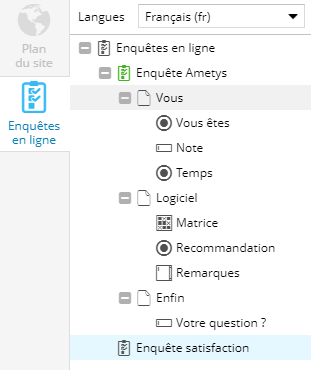
Outil "Enquêtes en lignes"
Cliquer sur le bouton Enquête en ligne de l'onglet Accueil pour ouvrir l'outil d'enquêtes.
Cet outil se présente sur forme d'un arbre et vous permet de créer, modifier ou supprimer des enquêtes.
Création d'une enquête
Étape 1: nouvelle enquête
1. Sélectionner une langue dans la liste déroulante disponible en haut de l'outil.
2. Cliquer sur le bouton Nouvelle Enquête pour créer une nouvelle enquête. Une boîte de dialogue s'ouvre avec les champs suivants :
| Champ | Description |
|
|---|---|---|
| Nom court | Le nom court sert à nommer l'enquête et n'est pas visible par le visiteur. Il est utilisé uniquement dans l'outil Enquêtes | |
| Titre | Le titre de l'enquête (optionnel) | |
| Illustration | Image d'illustration (optionnelle) | |
| Message de début | Message d'introduction de l'enquête (optionnel). Il sera affiché au visiteur avant le début de l'enquête. | |
| Message de fin | Message de conclusion de l'enquête (optionnel). Il sera affiché au visiteur à la fin de l'enquête. |

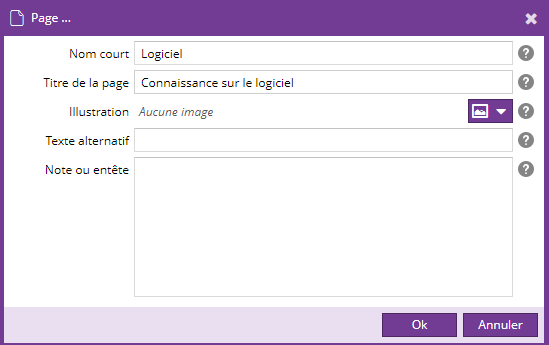
Étape 2: les pages de l'enquête
Une enquête est composée d'une ou plusieurs pages. Sélectionnez votre enquête dans l'arbre et cliquez sur le bouton Nouvelle page pour ajouter une nouvelle à l'enquête.
| Champ | Description |
|
|---|---|---|
| Nom court | Le nom court sert à nommer l'enquête et n'est pas visible par le visiteur. Il est utilisé uniquement dans l'outil Enquêtes | |
| Titre | Le titre de l'enquête qui s'affiche en haut de la page | |
| Illustration | Image d'illustration (optionnelle) | |
| Texte alternatif | Texte alternatif de l'illustration (optionnel) | |
| Note ou entête | Message optionnel pour guider ou informer le participant. Le message sera affiché en haut de la page. |
Les pages permettent d'organiser votre enquête en séries de questions. Le participant à l'enquête passera d'une page à l'autre par les boutons "Suivant" et "Précédent".
Les pages sont utilisées également pour définir une logique de branches (voir étapes 5: les branches)
Etape 3: les questions
Chaque page de l'enquête est composée d'une série de questions.

Il existe 3 types de questions:
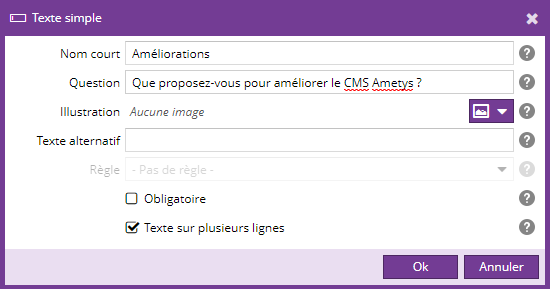
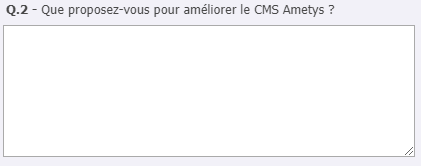
Question ouverte : texte simple sur une ou plusieurs lignes
Sélectionnez une page de l'enquête et cliquez sur le bouton Texte simple pour ajouter une question ouverte ou une question d'identité.
Une question ouverte est utilisée afin que les répondants puissent s'exprimer en toute liberté. Il est recommandé d'utiliser ce type de question à la fin d'un questionnaire.
Cocher la case Texte sur plusieurs lignes pour permettre à un répondant de rédiger un texte long.
Il est possible de donner des règles de validation : obligatoire, entier, décimal, email ou téléphone.
|
|
|
 |  |


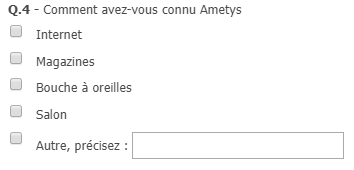
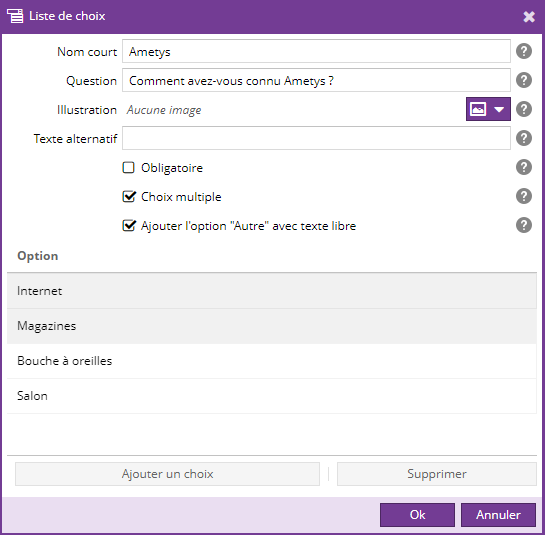
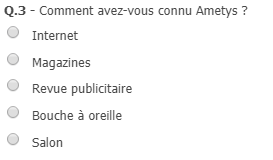
Question fermée, à réponse unique ou à choix multiple
Sélectionnez une page de l'enquête et cliquez sur le bouton Choix multiple pour ajouter une liste de choix.
La liste permet aux participants de choisir une ou plusieurs réponses parmi une liste définie par le rédacteur de l'enquête:
- Une seule réponse sélectionnable grâce à des boutons radios
- Plusieurs réponses possibles grâce à des cases à cocher.
|
|
|
|
|  |


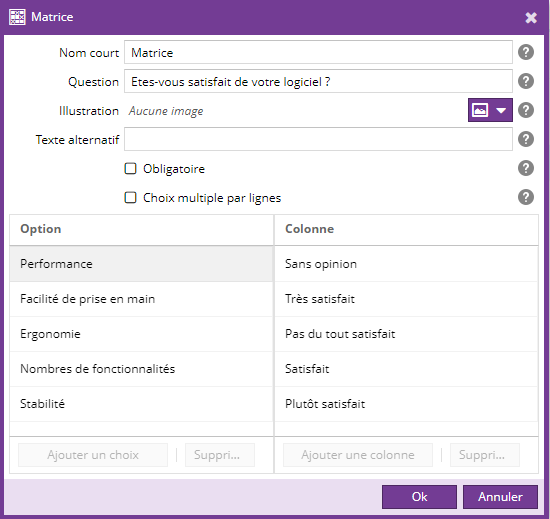
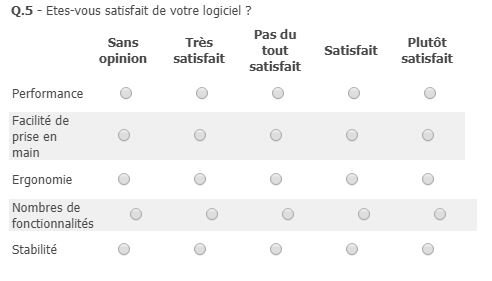
Matrice
Une matrice est une suite de questions disposées dans un tableau croisé de manière à ce qu'une réponse engage deux critères.
Initialement, une matrice accepte une réponse par rangée afin de restreindre le répondant, à moins de sélectionner l'option plusieurs réponses par ligne (case à cocher)
|
|
|
Étape 4: Prévisualisation de l'enquête
A tout moment, vous pouvez cliquez sur le bouton Prévisualisation ou double-cliquez sur une enquête pour afficher une prévisualisation de votre enquête.
![]()


Dans la prévisualisation, les règles de validation des questions (obligatoire, format de réponse, ..) ne sont pas appliquées.
Étape 5: Les branches (optionnelles)
La logique de branches permet de programmer le passage d'une série de questions (page) à une autre, selon les réponses données par l'utilisateur.
Sélectionnez une page de l'enquête et cliquez sur le bouton Branches pour définir une logique de la branche sur la page.
Les règles ne peuvent être définies que sur les questions de type 'liste à choix' (questions fermées).
|
|
|
|
| |
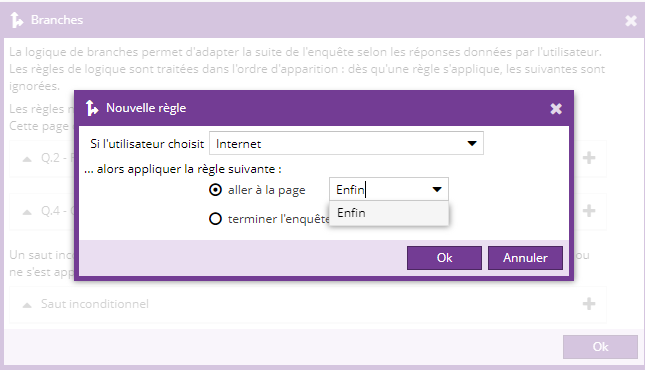
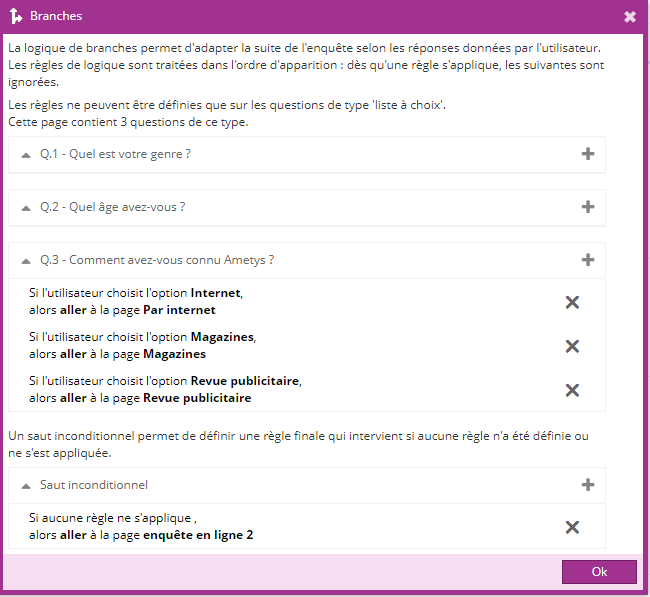
Les règles de logique sont traitées dans l'ordre d'apparition : dès qu'une règle s'applique, les suivantes sont ignorées.
Un saut inconditionnel permet de définir une règle finale qui intervient si aucune règle n'a été définie ou ne s'est appliquée.
Étape 6: Validation de l'enquête
Seules les enquêtes validées peuvent être affichées sur le site et accessibles aux visiteurs du site.
Sélectionnez votre enquête et cliquez sur le bouton Valider pour valider votre enquête.
Attention, une enquête validée ne peut plus être modifiée. Seul les textes des pages et libellés des questions pourront être modifiés après validation
Étape 7: Limiter l'accès de l'enquête
Vous pouvez limiter l'accès d'une enquête, pour cela vous devez sélectionner votre enquête et cliquez sur le bouton Limiter l'accès.![]()
L'outil de limitation d'accès sur l'enquête s'ouvre dans la zone centrale.

L'outil de limitation de l'enquête en front-office fonctionne de la même façon que la limitation d'accès d'une page.
Il est possible de limiter l'accès à une enquête validée.
Étape 8: Publication de l'enquête
Pour publier une enquête sur le site, il faut ajouter le service "Afficher une enquête". Seules les enquêtes validées peuvent être affichées par ce service.
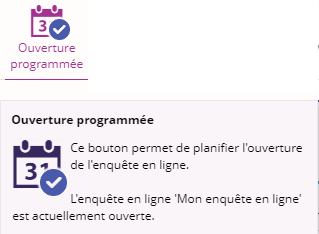
Étape 9: Programmer l'ouverture d'une enquête
Il est possible de planifier l'ouverture d'une enquête.
Sélectionner une enquête puis cliquer sur le bouton Ouverture programmée.
Vous pouvez alors définir une date de début et/ou une date de fin. En dehors de la plage définie, il ne sera pas possible de répondre à l'enquête.
L'icône et l'info bulle du bouton donne une indication sur le statut actuel de l'enquête.
|
Sans icône: aucune plage de date définie, enquête ouverte |
Icône horloge: date d'ouverture à venir |
Icône valider: enquête actuellement ouverte. |
Icône moins: date de fermeture dépassée |
|
|
|
|
|


Une enquête peut être mise en ligne via le service "Afficher une enquête" si elle est validée, quelles que soit ses dates d'ouvertures.
Si des dates d'ouverture sont définies, le service affichera un message si l'enquête n'est pas encore ouverte ou si elle est terminée, et il ne sera pas possible de répondre à l'enquête.

Consultations et exploitation des résultats

Sélectionnez une enquête puis cliquez sur Exportez les réponses pour exporter les résultats de l'enquête dans un tableur Excel.
Chaque soumission du formulaire d'enquête y est exposée sur une ligne avec la date de soumission.
Dans cet export, les réponses aux questions à texte libre sont visibles.
Voici un exemple d'export:

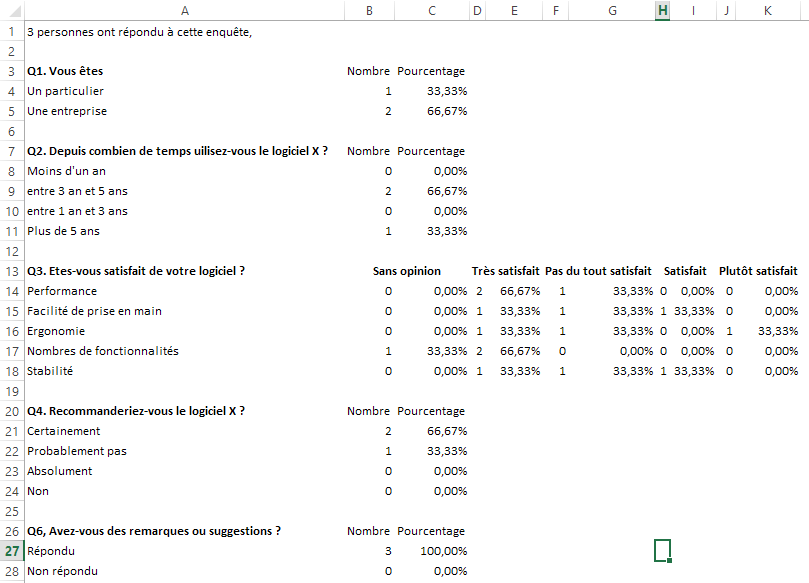
Vous pouvez également cliquez sur Exportez les réponses > Export synthétique pour exporter uniquement les statistiques de réponses: nombre de réponse et pourcentage pour chaque question.
Pour les questions de texte libre, les statistiques sont classées en "répondu/non répondu"
Voici un exemple d'export synthétique avec les mêmes données que précédemment:
Cliquer sur le bouton Statistiques pour visualiser les statistiques des résultats de l'enquête.

Les résultats s'affichent dans des tableaux et sous forme de graphique.

Il est possible de personnaliser l'affichage des résultats de recherche en sélectionnant les colonnes de votre choix.
Cliquez sur l’icône ![]() à droite de la colonne de votre choix.
à droite de la colonne de votre choix.
Vous pouvez de faire :
- Un tri croissant et décroissant des informations de la colonne sélectionnée.
- Cochez ou décochez les colonnes que vous souhaitez afficher
