Créer un site
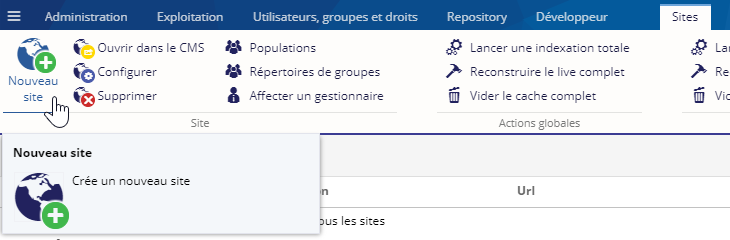
Pour créer un nouveau site, sélectionner le nœud dans lequel le site sera créé et cliquer sur le bouton Créer un nouveau site :
Un pop-up s'ouvre permettant de choisir le nom du site. C'est l'identifiant du site au sein d'Ametys. Il ne doit pas comporter d'espace et doit être en minuscule, par exemple www, production ou blog-mairie :
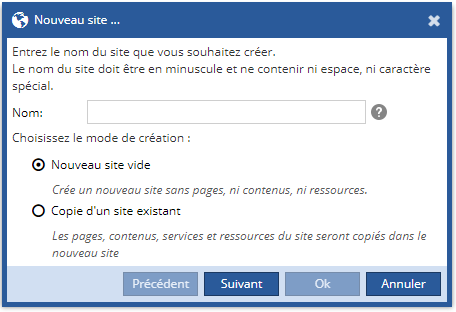
La pop-up propose de créer un site vide ou de le créer à partir d'un autre site.
Dans le cas de la création d'un site web par duplication, une copie des pages et des contenus est réalisée. Ceci permet d'avoir des templates de sites et de créer rapidement un site web.
Dans le cas de création d'un site web par duplication, les contenus copiés sont à l'état Brouillon. Une action de Validation est donc nécessaire pour que ceux-ci soient visibles sur le site. Plus d'information sur le cycle de vie d'un contenu disponible ici.
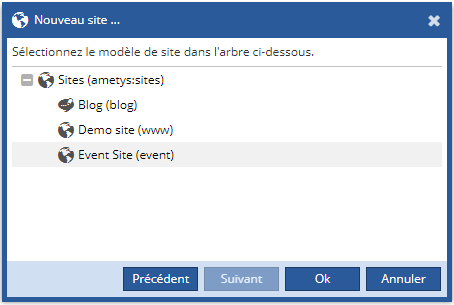
Si vous avez choisi l'option de duplication, l'étape suivante vous permet de choisir le site source :
Sinon, vous devrez sélectionner la typologie de site web :
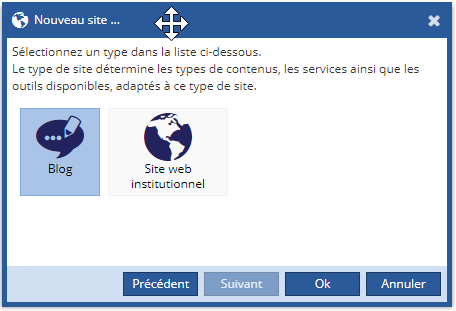
Les typologies de site disponibles dépendent de votre application.
Le type de site Blog fait parti du Plugin Blog (installé par défaut dans l'application de démonstration Ametys).
Les fonctionnalités liées à ce type de site sont décrites dans la section suivante du manuel utilisateur : Blog
Vous êtes ensuite redirigé vers l'écran de configuration.
Configuration du site
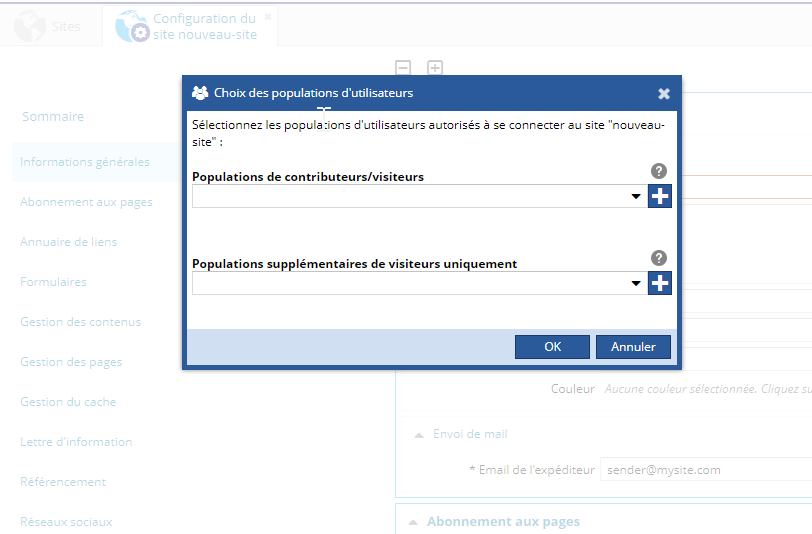
L'outil de configuration s'ouvre à la création du site. Une pop-up s'ouvre également, vous permettant de choisir les populations autorisées à se connecter au site :
La liste des paramètres à configurer dépend des fonctionnalités actuellement déployées sur votre application. Ici nous présentons la configuration telle qu'elle est visible dans l'application de démonstration d'Ametys.
|
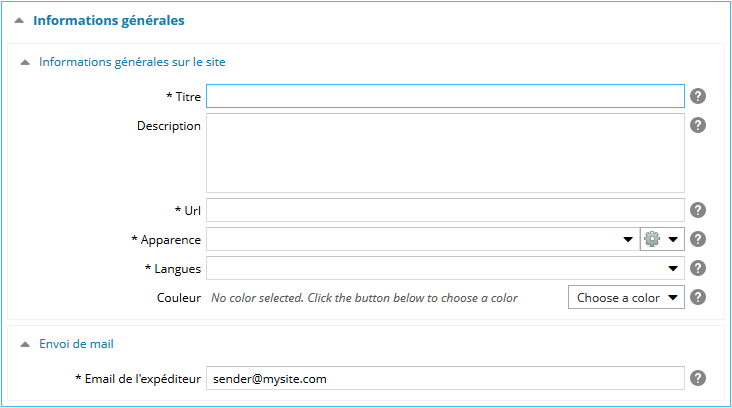
Dans la catégorie Informations générales,
- Rubrique Informations générales sur le site, renseignez les paramètres suivants:
- Le titre du site web. Ce titre sera utilisé dans la balise title de la page d'accueil,
- La description du site web. Cette description est utilisée dans le CMS Ametys pour fournir une indication au webmaster,
- L'adresse URL du site web. L'URL permet d'identifier le site au sein du CMS Ametys. Ce paramètre peut être une liste séparée par des virgules. La première URL est considérée comme l'URL principale. La gestion des noms de domaine est à la charge de l'administrateur.
Cette URL peut aussi servir de référence pour les accès externes (utilisateurs). Par exemple l'URL principale est utilisée pour construire les adresses fournies dans les mails (liens vers le site),
Veuillez vous référer à la description de l'architecture d'Ametys pour avoir une vision d'ensemble des composants et des communications inter-composants d'Ametys.
-
- La charte graphique du site web. Il est possible de choisir parmi les skins disponibles ou d'utiliser une nouvelle charte. Pour cela, utilisez le bouton situé à droite, vous pourrez importer, dupliquer ou générer un charte (plus d'informations sur ces actions à la page Gestion de modèles et de chartes graphiques),
- La langue du site,
- La couleur du pictogramme du site.
- Rubrique Envoi de mail : renseignez l'adresse e-mail de l'expéditeur des mails envoyés depuis le site.
|  |
|
Dans la catégorie Formulaires, choisissez le système de Captcha à utiliser pour protéger vos formulaires du spamming :
- Toujours : tous les formulaires seront protégés par un captcha, même si un utilisateur est connecté
- Jamais : aucun captcha
- Seulement sur les pages publiques : les formulaires contenus dans des pages à accès limité ne feront pas apparaitre de captcha
Le dernière option est l'option conseillée, notamment pour les intranets.
|  |
|
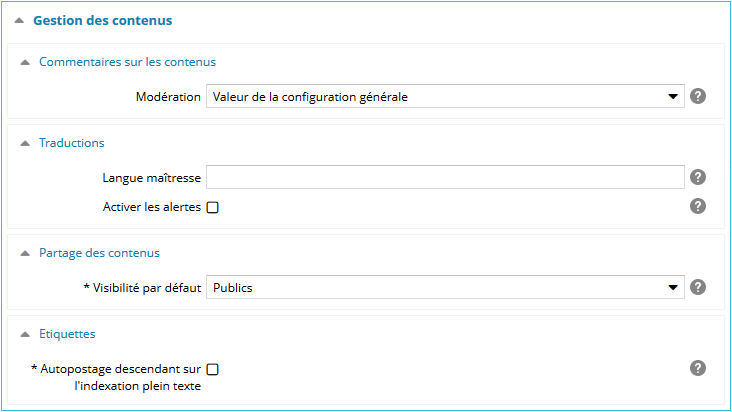
Dans la catégorie Gestion des contenus,
- Rubrique Commentaires sur les contenus : spécifiez si la modération doit se faire à priori ou à posteriori.
- Valeur de la configuration générale,
- A priori : les commentaires ne seront mis en ligne qu'après validation d'un contributeur possédant de tels droits,
- A posteriori : les commentaires sont automatiquement publiés mais restent modifiables.
- Rubrique Traductions, spécifiez la langue maîtresse (peut rester vide si il n'y a pas de langue principale) et si vous souhaitez activer les alertes de traduction.
- Rubrique Partage des contenus, choisissez la visibilité par défaut des contenus du site :
- Publics : les contenus peuvent être partagés sur tous les sites.
- Privés : les contenus ne peuvent être partagés sur d'autres sites.
- Protégés : les contenus ne peuvent être partagés que sur les sites parents ou enfants.
- Rubrique Etiquettes, spécifiez si vous souhaitez activer l'autopostage descendant pour prendre en compte la hiérarchie des étiquettes dans les recherches plein texte du moteur de recherche.
|  |
|
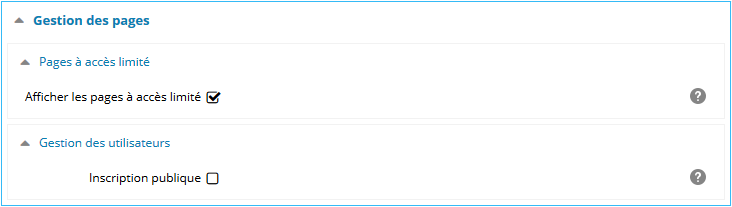
Dans la catégorie Gestion des pages,
- Rubrique Pages à accès limité, spécifiez si vous souhaitez afficher les liens vers les pages à accès limité dans les composants de navigations (menus, plan du site, fil d'ariane, etc...). En laissant cette case cochée (option recommandée par défaut) les liens vers les pages à accès limité seront visible pour tout le monde. Un visiteur ne possédant pas les droits vers une page limitée obtiendra une page d'erreur et/ou une demande de connexion.
Si l'option est décochée, les pages à accès limité n’apparaîtront dans la navigation que pour les utilisateurs autorisés.
Ce mode de fonctionnement réduit les performances du site, il est conseillé de ne décocher ce paramètre que sur les sites de type intranet ou à trafic réduit.
- Rubrique Gestion des utilisateurs, spécifiez si vous souhaitez que les utilisateurs puissent s'inscrire librement pour consulter les pages à accès limité du site.
|  |
|
Dans la catégorie Gestion du cache, spécifiez la durée de validité du cache (en secondes). Par défaut cette durée est de 0. Pour renforcer les performances de votre site en cas de surcharge, vous pouvez évaluer ce paramètre de 20s à 60s.
Attention, ce paramètre peut entraîner quelques incohérences sur le site pendant une durée inférieure à la durée de validité du cache.
|  |
|
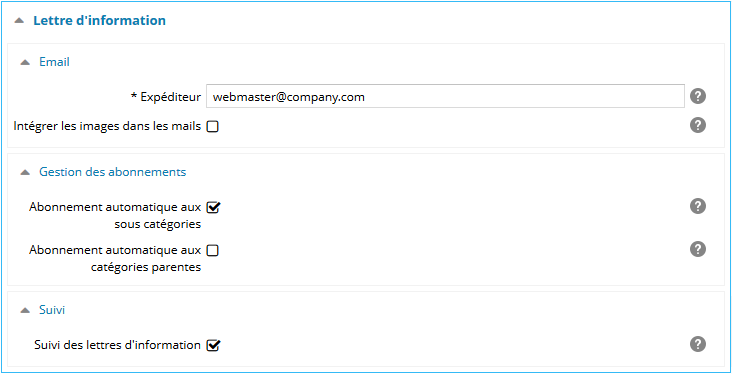
Dans la catégorie Lettre d'information,
- Rubrique Email, spécifiez l'adresse e-mail de l'expéditeur de la lettre et indiquez si vous souhaitez intégrer les images de la lettre d'information directement dans le corps HTML du mail. Cela est utile lorsque les clients de messagerie n'ont pas accès au site (intranet par exemple) et donc ne peuvent pas télécharger les images.
Intégrer les images dans les mails augmente considérablement le poids des images et donc celui de l'email envoyé.
- Rubrique Gestion des abonnements :
- Cochez la case Abonnement automatique aux sous catégories pour qu'un abonné à une catégorie soit automatiquement abonné à ses sous-catégories
- Cochez la case Abonnement automatique aux catégories parentes pour qu'un abonné à une catégorie soit automatiquement abonné à ses catégories parentes.
- Rubrique Suivi, indiquez si vous souhaitez activer le suivi des lettres d'information par Google Analytics.
|  |
|
Dans la catégorie Référencement, cochez la case Ping Activé? si vous souhaitez que le CMS envoie régulièrement la sitemap de ce site aux moteurs de recherche.
Faire un ping de votre sitemap vers les moteurs de recherche permet de leurs signaler la mise à jour de votre plan du site.
|  |
|
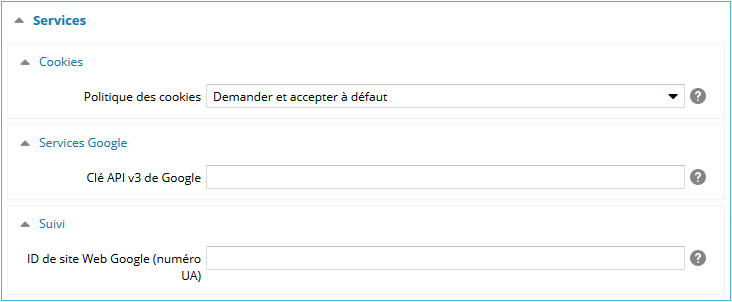
Dans la catégorie Services,
- Rubrique Cookies, choisissez une politiques concernant les cookies :
- Demander et accepter à défaut,
- Demander et refuser à défaut,
- Toujours accepter les cookies, si vous ne voulez pas laisser l'utilisateur décider s'il autorise les cookies à des fins de mesure d'audience. Cette fonctionnalité peut être une obligation légale selon les pays.
- Rubrique Services Google, renseignez la clé API v3 pour l'utilisation des services Google (Google maps, Youtube, Google Analytics, ...)
- Rubrique Suivi, renseignez l'ID de site Web Google, ou numéro UA (de la forme UA-XXXXXX-YY)
|  |
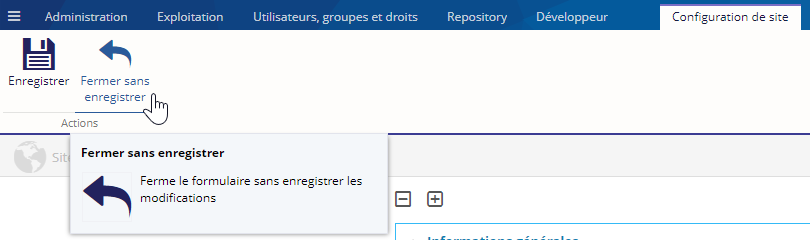
Vous pouvez ensuite enregistrer votre configuration en cliquant sur le bouton Enregistrer :
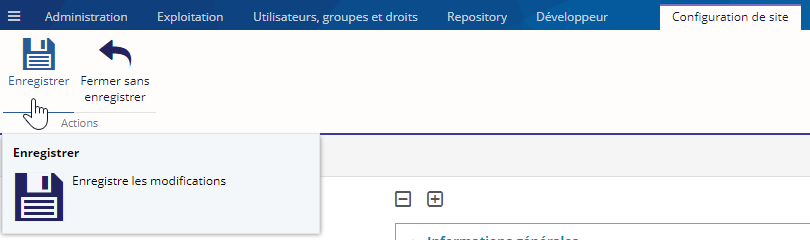
Ou fermer l'outil sans enregistrer en cliquant sur le bouton Fermer sans enregistrer. Attention, cette action entrainera la perte de vos modifications :