Tool presentation
The Lifecycle tool lets you visualize and construct a lifecycle.
The Lifecycle tool is available from version 4.8 onwards.
There are several types of life cycle:
- life cycles system which are used by default in Ametys
- life cycles users which are lifecycles created by users and which are essentially intended for forms.
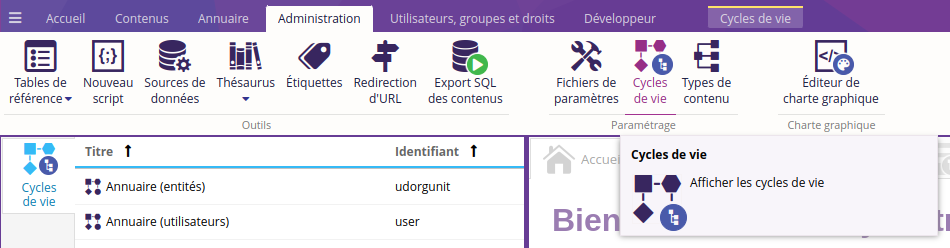
To access the "Lifecycles" button, the user must have the right to"View all lifecycles" (to view all lifecycles) or"View user lifecycles" (to view only lifecycles created by a user).
The tool is displayed as follows:
- The "Identifier " column is hidden by default; it displays the lifecycle identifier, which must be unique.
- The "Save" button is used to save changes made to a lifecycle.
To access the create, modify, duplicate and save functions, the user must have the right to"Manage all lifecycles" (to modify all lifecycles) or"Manage user lifecycles" (to modify only the lifecycles created by a user).
- The "Reset" button is used to delete all changes made since the last backup.
- The "Open" button displays a graph showing the life cycle in detail, and allows you to modify the life cycle when you have the right to do so.
- The "New " button is used to create a new life cycle.
- The "Rename " button is used to change the label of the selected life cycle, which appears in the menus for choosing a life cycle for an item.
- The"Duplicate" button is used to duplicate an existing life cycle.
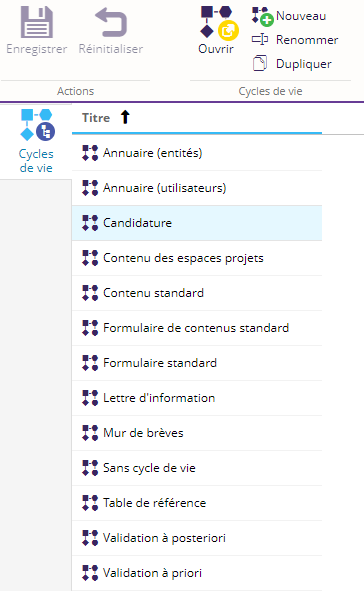
Creation of a new life cycle:

To create a new life cycle, click on the "New" button.
A dialog box appears, in which you must enter the label and identifier of the new life cycle.

The identifier accepts only alphanumeric characters and the hyphen "-".
To create a lifecycle for forms, the identifier must begin with "entry-form-"
A lifecycle containing changes will appear with a red banner. You need to save these changes to make them permanent, so that you can use the lifecycle.
Please note that these changes can only be saved once the lifecycle is valid, i.e. usable by Ametys. If this is not the case, an error message will appear and the changes will not be saved.

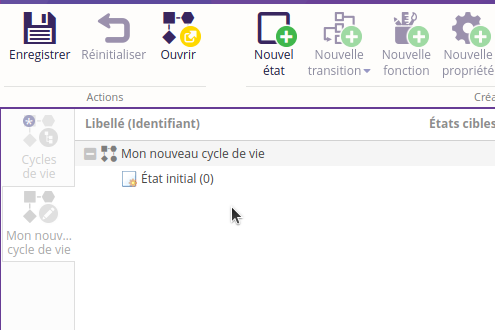
When the new life cycle is created, it appears with an initial state. This state is fictitious and serves as a starting point for the initial transitions.
- The first thing to do with a new life cycle is to add states using the New condition.
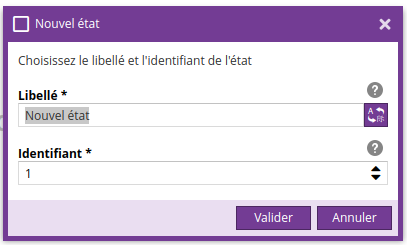 The identifier must be a whole number that is unique among other states. The wording can be translated into several languages.
 - Once there are several states, it is possible to create transitions. Transitions allow you to move to a new state in the cycle.
At least one transition from the initial state is required to start the cycle, and each state must be joined by a transition.
Transitions
To create a transition starting from a state, select the state and use the button New transition button:

As with states, the identifier is a unique integer among transitions, and the label is translatable into several languages.
The target state corresponds to the transition's default arrival state, while the options correspond to all states in the cycle, plus the "same state" option.
A transition can be added to several different states, so you need to think carefully about the default target state. Adding several conditional target states to the same transition is described below.
If you have created a transition that you want to start from more than one state, you can add them by going to the New transition menu:
A dialog box will then propose the transitions available to add to the selected state, and it is possible to add several transitions at once:

Functions
Functions are actions performed at different times in the cycle:
- in the case of functions applied to a transition, they are either executed before changing state or after arriving at the target state
- in the case of functions applied to a state, either the function executes before arriving in that state, regardless of which transition it passes through, or it executes on leaving the state;
In most cases, functions already have a predefined order of execution, which must be taken into account when deciding whether to add them to a transition or a state
Functions are executed in the order in which they are displayed in the action grid (first at the top of the list), and this order can be changed using the forward and backward buttons.
A function can be added by clicking on the "New function" button.New function "

The dialog box lets you select the action to be performed.
For user lifecycles, the list is reduced.
When a function is selected, parameter fields may appear.
User functions
- Enable / Disable form entry
- Add a comment
This function is coupled with the "need-comment" property and stores the comment in JCR.
- Send an email (Forms)
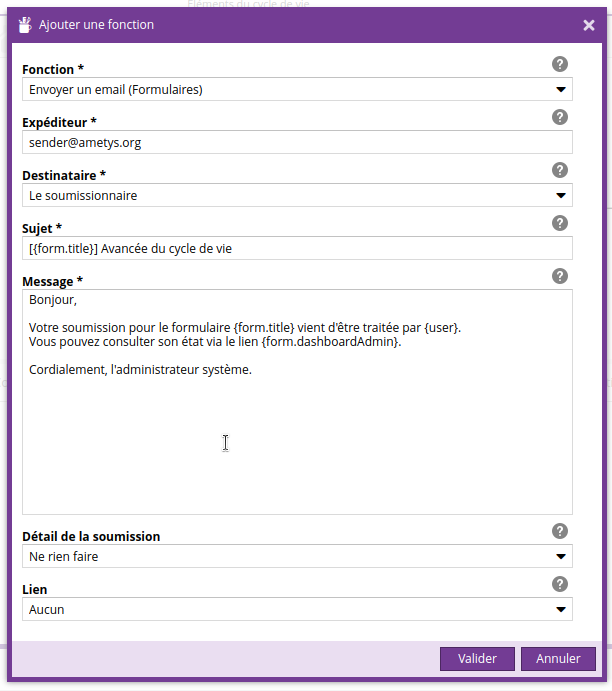
This function is used to configure a email to be sent on transition/state, and therefore expects several parameters:
-
- Sender: enter the mail address of the sender of the mail
- Recipient: this field has several possible options
- The bidderemail will be sent to the entry bidder
- Users belonging to a groupSelect a user group from among those available in the site's populations. Theemail will be sent to all users in the group.
- Users with one or more rights: allows you to select one or more rights. Theemail will be sent to users who have all these rights.
-
-
- Saisie manuelle: permet d’entrer des adresses email à la main. Il est possible d’utiliser des variables de la forme {x} qui sont indiquées dans la description du champ. Par exemple, pour récupérer l’adresse email saisie dans le champ texte “txt” d’un formulaire: il faut saisir {entry.txt} dans le champ “Insérer les adresses email”.
-
-
- Subject: the subject of theemail, it is also possible to insert variables in this field.
- Body: the content ofemail, variables can be inserted.
- Display response details: determines whether the values entered by the bidder are inserted in the body of theemail, the options are :
- display nothing
- display data visible to the bidder: some form fields may have restricted visibility. By selecting this option, the values displayed will be those of fields visible to a bidder.
- insert all data
- link: inserts a link from the drop-down list at the end of mail
- send if comment present: this parameter is useful when the lifecycle element contains the " need-comment" property : if this parameter is set to "yes",email will only be sent if the person advancing the lifecycle has entered a comment.
- Send a customizable email at runtime (Forms): this function allows you to send a mail whose content is entered as the lifecycle progresses.
Conditions
Conditions are used to restrict the use of a transition.
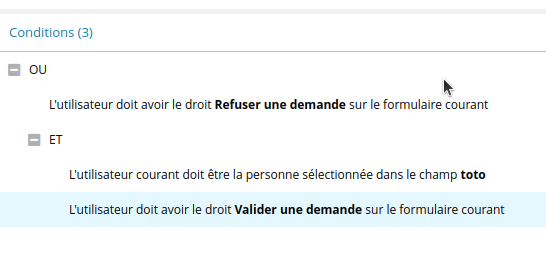
To use conditions, there are 2 types of elements:
- operators are used to define relationships between the conditions they cover

- AND: all conditions below this operator must be validated for the transition to execute
- OR: only one condition under this operator needs to be valid for the operator to be valid.
- conditions: what needs to be validated
In the example above, an OR operator is present at the root of the tree:
For the transition to run, the user must have the right to "Add content" or to create content , or the current content must belong to the user and not be locked.
By default, conditions created at the root of the tree will be linked by an AND condition.
To add a condition, use the New condition :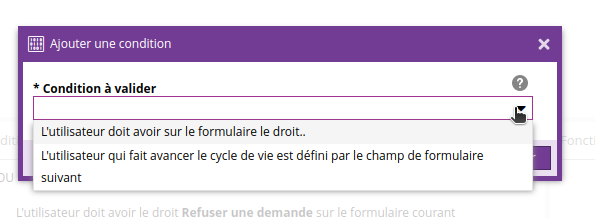
As with functions, when a condition is selected, the related parameter fields appear.
When nothing is selected, newly added elements will be added under the root operator. Otherwise, elements are added under the selection.
If the root is not visible ( AND operator), a condition is selected and you want to add an element to the root, simply click on the selected element to deselect it, then add the new element.
Before saving, check that there are no unconditional operators below.
Conditional target states
Target states are the arrival states after a transition, and there are 2 types:
- the unconditional target state: this is defined at the same time as the transition, as it is the state in which the transition will end if the conditions are not validated for the other target states
- conditional target states are states to which a transition can end if certain conditions are met
To add a conditional target state, select a transition in the tree on the left, then click on New conditional target state, and the available states will be displayed. If the "same state" option is selected, the transition will loop on the same state, whatever its original state.
As its name suggests, a target state expects conditions, which work in the same way as conditions for a transition. The difference is that a conditional target state (or child element) must be selected before clicking on the button, otherwise it will be added to the conditions column.
Please note that if a conditional target state has no conditions, it cannot be saved.
Properties
Properties are variables that require additional development in order to be used.
A property has a unique name within the same element (you can't have two properties named "status" in the Modify transition).
In the case of form lifecycles, there are associated core properties:
- statusThis property displays more meaningful icons on the dashboard side. Possible values are as follows:
- for shares:
- accept: for a validation action
- refuse: for a refusal action
- need-complements: for an intermediate action requiring user feedback
- for states
- accepted: for the validating state
- proposed: for status awaiting processing
- refused: for the state
- incomplete: when the form is awaiting completion
- for shares:
- action-typeproperty that allows additional actions to be performed when changing state. Values are:
- need-comment: allows you to enter a comment to be inserted in a email
- send-mail: sends a email to be configured
Duplicating a life cycle
Access to lifecycle duplication is linked to the "Manage all lifecycles" or "Manage user lifecycles" right (depending on the type of lifecycle to be duplicated).
After selecting an existing lifecycle, click on the Duplicate button to open the following window for selecting the label and identifier of the duplicated lifecycle.

After clicking on Validate, a new life cycle is available, copying the initial one.