Connexion avec Facebook
Créer un compte Facebook pour votre institution
Tout d’abord, veuillez créer un compte Facebook pour votre institution.
Ensuite rendez-vous sur ce lien https://developers.facebook.com/ puis cliquez sur « Commencer » en haut à droite puis créer votre compte "Facebook for developers" en suivant les instructions. Une fois le compte créé, cliquez sur « Créer une App », choisissez « Consommateur » comme type d’application, puis entrez vos informations.
Configuration projet Facebook
Dans « Paramètres » puis dans « Général » vous trouverez :
-
Votre Identifiant de l’application
-
Votre clé secrète
Dans « Paramètres » puis dans « Avancé », dans la catégorie «Partager la liste d’éléments autorisés de redirection » ajoutez les URI suivants :
- <BOserver_url>/_extra-user-management/oidc-callback
(<BOserver_url> par ex: https://cms.mywebsite.com ou https://www.mywebsite.com/cms) - <SITEserver_url>/_extra-user-management/oidc-callback
(A saisir plusieurs fois si vous utilisez plusieurs url racines comme https://www.mywebsite.com et https://www.otherwebsite.com)
Une fois ces étapes de configurations Facebook effectuées, vous devrez retourner sur les paramètres généraux pour « Démarrer la vérification » dans «Vérification».
Configuration de la connexion dans le CMS
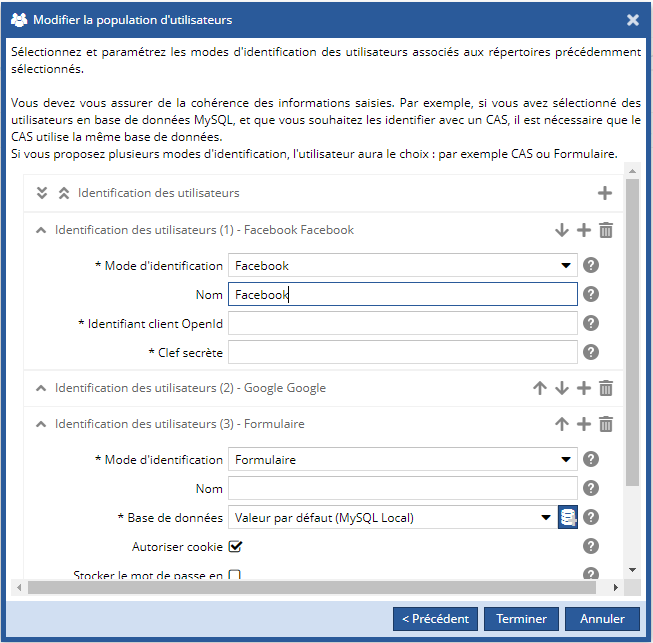
Rendez-vous sur l'espace administrateur du CMS (_admin) et ajoutez un nouveau type d'identification des utilisateur à une population existante ou une nouvelle population.
Dans “Mode d’authentification” choisissez “Facebook”.
Dans “Identifiant client OpenId” et “Clé secrète” entrez respectivement votre ClientID et votre code secret générés plus tôt. Puis cliquez sur "Terminer".
Vos utilisateurs peuvent désormais se connecter à l’aide de leur compte Facebook.