Installation
- Arrêter le serveur
- Télécharger les jars du plugin et ajouter-les (ametys-plugin-forms-1.9.0.jar et ametys-plugin-forms-resources-1.9.0.jar) dans le répertoire WEB-INF/lib de votre application Ametys
- Le plugin nécessite la création de tables SQL pour le stockage de workflow des entrées des formulaires
Exécutez le script SQL correspondant à votre installation: http://viewvc.ametys.org/viewvc/trunk/plugins/workflow/tags/1.5.0/main/plugin-workflow/scripts/ - Ajouter le bouton permettant de visualiser les données d'un formulaire dans le fichier WEB-INF/params/cms-ribbon-default.xml. L'identifiant du menu est org.ametys.forms.ShowFormEntries.
Ajouter le bouton dans l'onglet contextuel des contenus org.ametys.cms.content.Tab - Dans ce même fichier, pour pouvoir créer un formulaire dans l'édition des contenu, ajoutez également le bouton org.ametys.plugins.forms.Insert dans l'onglet org.ametys.cms.content.EditionTab
- Dans ce même fichier, ajouter le bouton permet de visualiser tous les formulaires présents dans les contenus du site, dans l'onglet Accueil. L'identifiant du bouton est org.ametys.plugins.forms.FormsList
- Dans ce même fichier, importer le fichier de ribbon propre aux formulaires cocoon://plugins/forms/ribbon.xml
<tabs>
	<tab label="RIBBON_TABS_TAB_HOME_LABEL">
   		<groups>
        	<group label="RIBBON_TABS_TAB_HOME_GROUPS_GROUP_TOOL_LABEL" icon="">
				<large>...</large>
            	<medium>
					[...]
					<control id="org.ametys.plugins.forms.FormsList"/>
				</medium>
				<small>...</small>
			</group>
	 <tab label="plugin.cms:RIBBON_TABS_TAB_CONTENT_LABEL" id="org.ametys.cms.content.Tab">
    	<groups>
			[...]
			<group label="plugin.cms:RIBBON_TABS_TAB_CONTENT_GROUPS_GROUP_TOOL_LABEL" icon="" priority="-10">
				<large>
					[...]
					<control id="org.ametys.forms.ShowFormEntries"/>
				</large>
				<medium>
					[...]
					<control id="org.ametys.forms.ShowFormEntries"/>
				</medium>
				<small/>
    		</group>
			[...]
		</groups>
	<tab>
	[...]
	<tab label="plugin.cms:RIBBON_TABS_TAB_CONTENT_EDIT_LABEL" id="org.ametys.cms.content.EditionTab">
		<groups>
			[...]
			<group label="plugin.cms:RIBBON_TABS_TAB_CONTENT_EDIT_GROUPS_GROUP_INSERT_LABEL" icon="">
				<large>...</large>
				<medium>
					...
					<layout align="top" size="small">
                    	<control id="org.ametys.cms.edition.toc.Insert"/>
                        <control id="org.ametys.cms.edition.symbol.Insert"/>
                        <control id="org.ametys.plugins.forms.Insert"/>
					</layout>
					...
				</medium>
				<small>...</small>
			</group>
		</groups
	</tab>

	<!-- Forms -->
	<import>cocoon://plugins/forms/ribbon.xml</import>
</tabs>
Attention ! Si le groupe contient une description , et , il faut ajouter le bouton dans les 3.
Dans le fichier de workflow des contenus WEB-INF/param/workflow.xml, ajouter une post-function org.ametys.plugins.forms.workflow.FormEditionFunction permettant de traiter les formulaires présents dans les contenus lors de la sauvegarde.
Pour cela, copier le code XML suivant et copier-le à la fin de l'action d'édition portant l'identifiant n°2, juste après la balise <results><post-functions> <function type="avalon"> <arg name="role">org.ametys.plugins.forms.workflow.FormEditionFunction</arg> </function> </post-functions>Vous devriez ainsi avoir:
<action id="2" name="plugin.web:WORKFLOW_ACTION_EDIT"> <restrict-to> <conditions type="AND"> <condition type="avalon"> <arg name="role">org.ametys.cms.workflow.ContentCheckRightsCondition</arg> <arg name="right">Workflow_Rights_Edition_Online</arg> </condition> <condition type="avalon"> <arg name="role">org.ametys.cms.workflow.LockCondition</arg> </condition> </conditions> </restrict-to> <pre-functions> <function type="avalon"> <arg name="role">org.ametys.cms.workflow.EditContentFunction</arg> </function> </pre-functions> <results> <unconditional-result old-status=" " status=" " step="1" /> </results> <post-functions> <function type="avalon"> <arg name="role">org.ametys.plugins.forms.workflow.FormEditionFunction</arg> </function> </post-functions> </action>- Redémarrer le serveur
Cycles de vie des entrées des formulaires
Il est possible de définir un ou plusieurs cycles de vie (workflow) pour les entrées des formulaires.
Pour chacun des cycles de vie, vous devrez définir :
- un fichier XML de description du workflow
- les éventuels droits associés aux actions du workflow
- les libellés et icônes associés à chaque état / action du workflow
- les boutons disponibles dans le back-office pour faire avancer le workflow
L'ajout d'un ou plusieurs workflows pour les formulaires, nécessite l'ajout d'un plugin dans votre application.
Le workflow sur les entrées nécessite la création de table SQL
Exécutez le script SQL correspondant à votre installation si vous ne l'avez pas déjà fait l'étape d'installation: http://viewvc.ametys.org/viewvc/trunk/plugins/workflow/tags/1.5.0/main/plugin-workflow/scripts/
Etape 1: intégration du workflow standard Ametys
Ametys fournit en exemple un workflow standard que vous pourrez ensuite personnaliser et compléter.
Voici les étapes suivantes pour intégrer le workflow standard :
1) Télécharger et dézipper dans le répertoire plugins de votre application le plugin "default-form-workflow" fournit ici : default-form-workflow.zip
Ce plugin définit un cycle de vie à 4 états sur chacune des entrées :
- Proposé : un visiteur a soumis une demande (réponse au formulaire)
- Accepté : le webmaster a accepté la demande
- Refusé: le webmaster a refusé la demande
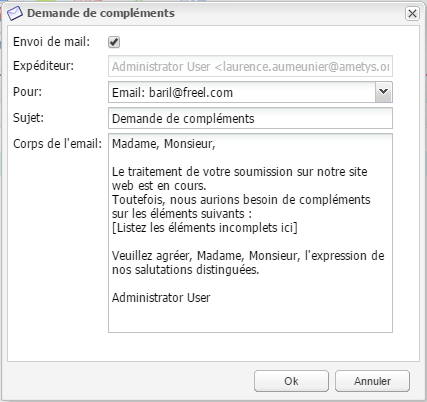
- Demande de complément: le webmaster a demandé des compléments au soumissionnaire de la demande
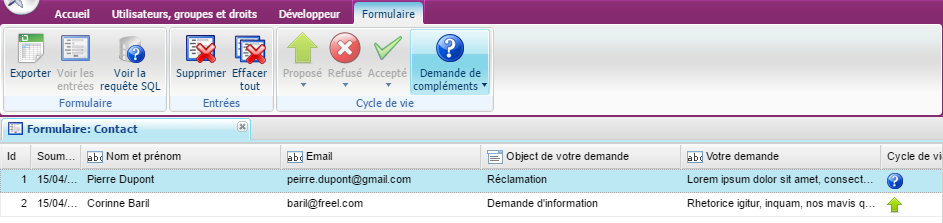
Dans ce workflow, il est possible d'envoyer un mail au soumissionnaire de la demande lors d'une demande de compléments:
2) Ajouter le fichier de description du workflow
Télécharger et enregistrer le fichier de description de workflow dans le répertoire WEB-INF/param de votre application : workflow-form-default.xml
Ce fichier contient la description des états et actions du cycle de vie.
3) Ajouter la référence au nouveau workflow
Dans le fichier WEB-INF/param/workflows.xml, ajouter la référence au nouveau workflow "form-default"
workflows.xml
<?xml version="1.0" encoding="UTF-8"?>
<workflows>
	<workflow name="content" type="file" location="workflow.xml"/>
  	<workflow name="newsletter" type="file" location="workflow-newsletter.xml"/>
  	<workflow name="ugc" type="file" location="workflow-ugc.xml"/>
  	<workflow name="blog" type="file" location="workflow-blog.xml"/>
  	<workflow name="form-default" type="file" location="workflow-form-default.xml"/>
</workflows>
Le nom des workflows spécifiques aux entrées des formulaires doivent nécessairement commencer par "form-".
4) Définissez le libellé de votre workflow
Dans les fichiers de traductions WEB-INF/i18n/application*.xml, ajouter une ligne pour définir le libellé de votre workflow. La clé est "WORKFLOW_" suivi du nom du workflow soit WORLFLOW_form-default
<message key="WORKFLOW_form-default">Standard</message>
Le workflow est prêt ! Vous pouvez redémarrer le serveur et l'utiliser dans vos formulaires
Etape 2: personnalisation du workflow standard (optionnel)
Vous pouvez personnaliser le workflow standard en ajoutant / supprimant des actions / états de workflow.
Le paramétrage du workflow est identique aux autres workflows de l'application. Rendez vous sur la page Paramètrage du workflow pour en savoir plus.
Si vous ajoutez un état, vous devrez ajouter dans le fichier plugin.xml la déclaration du bouton représentant cet état.
Ce bouton doit être défini suivant le modèle ci-dessous :
<extension id="form-wokflow-button.form-default.[id_etat]"
           point="org.ametys.cms.workspace.ribbon.RibbonControlsManager"
           class="org.ametys.plugins.forms.workflow.FormEntriesWorkflowMenu">
     <workflow name="form-default">
     	<step>[id_etat]</step>
           	<actions mode="include">
				<!-- Liste des actions disponibles depuis cet état -->
				<action>[id_action]</action>
				<action>[id_action]</action>
			</actions>

			<!-- Activiter ou désactiver les commentaires -->
            <comments mode="include"/>
	  <workflow>
</extension>
L'identifiant du bouton doit être composé de "form-wokflow-button." suivi du nom du workflow, suivi de ".", suivi de l'identifiant de l'état de workflow.
N'oubliez pas d'ajouter les clés i18n et icônes associés à vos nouveaux états.
Etape 3: ajouter un nouveau workflow (optionnel)
Pour chaque ajout d'un nouveau workflow vous devrez suivre les étapes suivantes :
- Créez un fichier de description de votre workflow dans le répertoire WEB-INF/param de votre application.
Rendez vous sur la page Paramètrage du workflow pour en savoir plus. Nommez et référencez votre workflow dans le fichier WEB-INF/param/workflows.xml
Le nom du workflow doit commencer par "form-" (ex: form-monworkflow)
- Définissez le libellé du worflow dans les fichiers WEB-INF/i18n/application*xml
La clé doit être "WORKFLOW_" suivi du nom du workflow (ex: WORKFLOW_form-monworkflow) Copier/coller la déclaration de l'extension suivante dans un fichier plugin.xml, en remplacement "form-default" par le nom de votre workflow
<extension id="form-wokflow-tab.form-default" point="org.ametys.cms.workspace.ribbon.RibbonTabsManager" class="org.ametys.runtime.ui.impl.StaticContextualClientSideElement"> <action class="org.ametys.plugins.forms.workflow.FormEntriesWorkflowTab"> <param name="target-type">^(content-form)$</param> <param name="workflow-name">^(form-default)$</param> </action> <scripts> <file plugin="forms">js/org/ametys/forms/workflow/FormEntriesWorkflowTab.js</file> </scripts> </extension>Définissez un bouton de workflow pour chaque état de workflow, sur le modèle suivant :
<extension id="form-wokflow-button.[nom_workflow].[id_etat]" point="org.ametys.cms.workspace.ribbon.RibbonControlsManager" class="org.ametys.plugins.forms.workflow.FormEntriesWorkflowMenu"> <workflow name="form-default"> <step>[id_etat]</step> <actions mode="include"> <!-- Liste des actions disponibles depuis cet état --> <action>[id_action]</action> <action>[id_action]</action> </actions> <!-- Activiter ou désactiver les commentaires --> <comments mode="include"/> <workflow> </extension>L'identifiant du bouton doit être composé de "form-wokflow-button." suivi du nom du workflow, suivi de ".", suivi de l'identifiant de l'état de workflow.