Créer un gabarit de lettre d'information Exemple de gabarit pour la version HTML (Fichier template.xsl) Exemple de gabarit pour la version HTML (Fichier template-text.xsl) Personnalisation avancée Insérer un sommaire automatique Lien pour se désabonner à lettre d'information Lien pour voir la lettre d'information en ligne Créer un modèle de lettre d'information Exemple
Cette page est destinée aux intégrateurs ayant un minimum connaissances en HTML, CSS, XML, XSL, I18N.
Créer un gabarit de lettre d'information Ce plugin nécessite l'integration graphique d'au moins un gabarit pour la lettre d'information.
Pour chaque gabarit, vous devez créer des feuilles de styles (fichiers xsl) permettant de générer la lettre d'information aux formats HTML et texte:
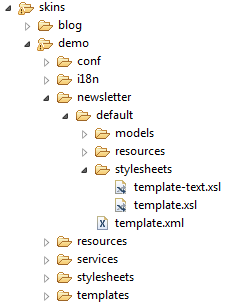
Un fichier template.xsl pour la version HTML Un fichier template-text.xsl pour la version texte. Ces fichiers doivent se trouver dans un répertoire de la charte graphique dans skins/[nom_skin]/newsletter/[nom_gabarit]/stylesheets
Exemple de gabarit pour la version HTML (Fichier template.xsl)
<xsl:template match="/">
<html>
<head>
<xsl:copy-of select="/html/head/node()"/>
<link type="text/css" href="{$skincontext}/css/newsletter.css" rel="stylesheet" media="screen" />
</head>

<body>
<div id="email-box">

<div id="box">

<div id="header">
<!-- Header here (title, date, number, ...)-->
</div>

<div class="content">
<xsl:apply-templates select="/html/body/node()"/>
</div>

<div id="footer">
<!-- Footer here (mentions, unsubscribe, ...) -->
</div>

</div>
</div>
</body>
</html>
</xsl:template>
<xsl:template match="/">
<html>
<head>
<xsl:copy-of select="/html/head/node()"/>
<link type="text/css" href="{$skincontext}/css/newsletter.css" rel="stylesheet" media="screen" />
</head>
<body>
<div id="email-box">
<div id="box">
<div id="header">
<!-- Header here (title, date, number, ...)-->
</div>
<div class="content">
<xsl:apply-templates select="/html/body/node()"/>
</div>
<div id="footer">
<!-- Footer here (mentions, unsubscribe, ...) -->
</div>
</div>
</div>
</body>
</html>
</xsl:template>
<xsl:template match="/">
<html>
<head>
<xsl:copy-of select="/html/head/node()"/>
<link type="text/css" href="{$skincontext}/css/newsletter.css" rel="stylesheet" media="screen" />
</head>

<body>
<div id="email-box">

<div id="box">

<div id="header">
<!-- Header here (title, date, number, ...)-->
</div>

<div class="content">
<xsl:apply-templates select="/html/body/node()"/>
</div>

<div id="footer">
<!-- Footer here (mentions, unsubscribe, ...) -->
</div>

</div>
</div>
</body>
</html>
</xsl:template> Exemple de gabarit pour la version HTML (Fichier template-text.xsl)
<xsl:template match="/">
<html>
<head>
</head>

<body>
<!-- Header -->
<xsl:text>---------------------------------------------------------------------------------------------------------</xsl:text><xsl:text>
</xsl:text>

<xsl:apply-templates select="/html/body/node()"/>

<xsl:text>---------------------------------------------------------------------------------------------------------</xsl:text><xsl:text>
</xsl:text>
<!-- Footer (mentions, unsubscribe, ...) -->
</body>

</html>

</xsl:template>


<xsl:template match="h3"><xsl:text>
</xsl:text>. <xsl:value-of select="normalize-space(text())"/><xsl:text>
</xsl:text>
</xsl:template>

<xsl:template match="h2"><xsl:text>
</xsl:text><xsl:value-of select="translate(text(), 'abcdefghijklmnopqrstuvwxyz', 'ABCDEFGHIJKLMNOPQRSTUVWXYZ')"/><xsl:text>
</xsl:text>
</xsl:template>

<xsl:template match="p"><xsl:apply-templates/><xsl:text>
</xsl:text>
</xsl:template>

<xsl:template match="br"><xsl:text>
</xsl:text>
</xsl:template>

<xsl:template match="img">[<xsl:value-of select="@alt"/>]
</xsl:template>

<xsl:template match="a"><xsl:value-of select="text()"/><xsl:text> </xsl:text><xsl:value-of select="@href"/>
</xsl:template>

<xsl:template match="text()"><xsl:value-of select="normalize-space(.)"/></xsl:template>
<xsl:template match="/">
<html>
<head>
</head>
<body>
<!-- Header -->
<xsl:text>---------------------------------------------------------------------------------------------------------</xsl:text><xsl:text>
</xsl:text>
<xsl:apply-templates select="/html/body/node()"/>
<xsl:text>---------------------------------------------------------------------------------------------------------</xsl:text><xsl:text>
</xsl:text>
<!-- Footer (mentions, unsubscribe, ...) -->
</body>
</html>
</xsl:template>
<xsl:template match="h3"><xsl:text>
</xsl:text>. <xsl:value-of select="normalize-space(text())"/><xsl:text>
</xsl:text>
</xsl:template>
<xsl:template match="h2"><xsl:text>
</xsl:text><xsl:value-of select="translate(text(), 'abcdefghijklmnopqrstuvwxyz', 'ABCDEFGHIJKLMNOPQRSTUVWXYZ')"/><xsl:text>
</xsl:text>
</xsl:template>
<xsl:template match="p"><xsl:apply-templates/><xsl:text>
</xsl:text>
</xsl:template>
<xsl:template match="br"><xsl:text>
</xsl:text>
</xsl:template>
<xsl:template match="img">[<xsl:value-of select="@alt"/>]
</xsl:template>
<xsl:template match="a"><xsl:value-of select="text()"/><xsl:text> </xsl:text><xsl:value-of select="@href"/>
</xsl:template>
<xsl:template match="text()"><xsl:value-of select="normalize-space(.)"/></xsl:template>
<xsl:template match="/">
<html>
<head>
</head>

<body>
<!-- Header -->
<xsl:text>---------------------------------------------------------------------------------------------------------</xsl:text><xsl:text>
</xsl:text>

<xsl:apply-templates select="/html/body/node()"/>

<xsl:text>---------------------------------------------------------------------------------------------------------</xsl:text><xsl:text>
</xsl:text>
<!-- Footer (mentions, unsubscribe, ...) -->
</body>

</html>

</xsl:template>


<xsl:template match="h3"><xsl:text>
</xsl:text>. <xsl:value-of select="normalize-space(text())"/><xsl:text>
</xsl:text>
</xsl:template>

<xsl:template match="h2"><xsl:text>
</xsl:text><xsl:value-of select="translate(text(), 'abcdefghijklmnopqrstuvwxyz', 'ABCDEFGHIJKLMNOPQRSTUVWXYZ')"/><xsl:text>
</xsl:text>
</xsl:template>

<xsl:template match="p"><xsl:apply-templates/><xsl:text>
</xsl:text>
</xsl:template>

<xsl:template match="br"><xsl:text>
</xsl:text>
</xsl:template>

<xsl:template match="img">[<xsl:value-of select="@alt"/>]
</xsl:template>

<xsl:template match="a"><xsl:value-of select="text()"/><xsl:text> </xsl:text><xsl:value-of select="@href"/>
</xsl:template>

<xsl:template match="text()"><xsl:value-of select="normalize-space(.)"/></xsl:template> Personnalisation avancée Insérer un sommaire automatique Le code XSL ci-après vous donne un exemple pour insérer de manière automatique un sommaire dans la lettre d'information.
<xsl:template name="toc">
        <xsl:if test="/html/body//div[@id = 'newsletter-content']/div[@class = 'center']/div[@class = 'articles']//h1">
            <div id="toc">
                <h2><i18n:text i18n:key="NEWSLETTER_TOP_OF_CONTENT" i18n:catalogue="skin.{$skin}"/></h2>

                <xsl:call-template name="toc-list"/>
            </div>
        </xsl:if>
 </xsl:template>

 <xsl:template name="toc-list">
       <ul>
            <xsl:for-each select="/html/body//div[@id = 'newsletter-content']/div[@class = 'center']/div[@class = 'articles']//h1">
                <li>
                    <a href="#go-to-{count(preceding::h1)}"><xsl:value-of select="text()"/></a>
                </li>
            </xsl:for-each>
        </ul>
 </xsl:template>
Lien pour se désabonner à lettre d'information Ajoutez le bout de code XSL suivant pour ajouter un lien de désinscription dans votre gabarit
<a href="{$contextPath}/{$lang}/_plugins/newsletter/page/unsubscribe?token=#token#"><i18n:text i18n:key="NEWSLETTER_FOOTER_MENTIONS_4" i18n:catalogue="skin.{$skin}"/></a> <a href="{$contextPath}/{$lang}/_plugins/newsletter/page/unsubscribe?token=#token#"><i18n:text i18n:key="NEWSLETTER_FOOTER_MENTIONS_4" i18n:catalogue="skin.{$skin}"/></a>
<a href="{$contextPath}/{$lang}/_plugins/newsletter/page/unsubscribe?token=#token#"><i18n:text i18n:key="NEWSLETTER_FOOTER_MENTIONS_4" i18n:catalogue="skin.{$skin}"/></a> Ce lien permet de se désinscrire directement à la lettre d'information.
A partir de la version 2.8.0 , vous pouvez insérer un lien vers la page contenant le service "Abonnement et gestion Lettre d'info" (en identifiant la page au moyen d'une étiquette par exemple)
<xsl:variable name="pageId" select="ametys:findPagesIdsByTag($siteName, $lang, 'MY_TAG')/@id"/>
<a href="{resolver:resolve('page', $pageId)}?token=#token#"><i18n:text i18n:key="NEWSLETTER_FOOTER_MENTIONS_4" i18n:catalogue="skin.{$skin}"/></a>
<xsl:variable name="pageId" select="ametys:findPagesIdsByTag($siteName, $lang, 'MY_TAG')/@id"/>
<a href="{resolver:resolve('page', $pageId)}?token=#token#"><i18n:text i18n:key="NEWSLETTER_FOOTER_MENTIONS_4" i18n:catalogue="skin.{$skin}"/></a>
<xsl:variable name="pageId" select="ametys:findPagesIdsByTag($siteName, $lang, 'MY_TAG')/@id"/>
<a href="{resolver:resolve('page', $pageId)}?token=#token#"><i18n:text i18n:key="NEWSLETTER_FOOTER_MENTIONS_4" i18n:catalogue="skin.{$skin}"/></a> Ce lien permet de gérer son abonnement à toutes les lettres d'information.
Lien pour voir la lettre d'information en ligne Ajoutez le bout de code suivant pour ajouter un lien pour visualiser la lettre d'information en ligne
<xsl:if test="$mail = 'true'">
<a href="{$contextPath}/_wrapped-content/{/html/head/meta[@name = 'contentName']/@content}.html"><i18n:text i18n:key="SKIN_NEWSLETTER_TEMPLATE_REDIRECT_2" i18n:catalogue="skin.{$skin}"/></a>
</xsl:if>
<xsl:if test="$mail = 'true'">
<a href="{$contextPath}/_wrapped-content/{/html/head/meta[@name = 'contentName']/@content}.html"><i18n:text i18n:key="SKIN_NEWSLETTER_TEMPLATE_REDIRECT_2" i18n:catalogue="skin.{$skin}"/></a>
</xsl:if>
<xsl:if test="$mail = 'true'">
<a href="{$contextPath}/_wrapped-content/{/html/head/meta[@name = 'contentName']/@content}.html"><i18n:text i18n:key="SKIN_NEWSLETTER_TEMPLATE_REDIRECT_2" i18n:catalogue="skin.{$skin}"/></a>
</xsl:if> Créer un modèle de lettre d'information Un modèle de lettre d'information est un fichier XML utilisé pour guidé le webmaster lorsqu'il crée ou édite sa lettre d'information.
Une lettre d'information nouvellement créée sera pré-remplie par ce modèle.
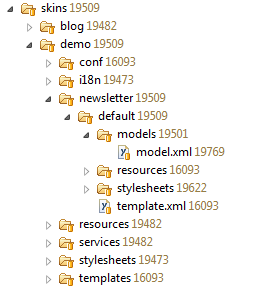
Il y a un modèle pour chaque gabarit. Le fichier de modèle doit se trouver dans un répertoire de la charte graphique dans skins/[nom_skin]/newsletter/[nom_gabarit]/model/model.xml
Le fichier doit contenir la balise racine <model> suivi du code HTML qui sera ajouté dans le contennu de la lettre d'information au moment de la création.
Voici un exemple simple de modèle:
<model lang="en">
<div id="newsletter-content">
<div class="center">
<div class="edito">
<h1>Edito</h1>
<p>
Enter the edito here
</p>
</div>

<div class="articles">
<p>Insert the last publication here</p>
</div>
</div>

<div class="sidebar">
<div class="encart">
<h2>Zoom</h2>
<p>Enter the zoom here.</p>
</div>

<div class="encart last">
<h2>Links</h2>
<p>Enter the new links here</p>
</div>
</div>

</div>
</model>
<model lang="en">
<div id="newsletter-content">
<div class="center">
<div class="edito">
<h1>Edito</h1>
<p>
Enter the edito here
</p>
</div>
<div class="articles">
<p>Insert the last publication here</p>
</div>
</div>
<div class="sidebar">
<div class="encart">
<h2>Zoom</h2>
<p>Enter the zoom here.</p>
</div>
<div class="encart last">
<h2>Links</h2>
<p>Enter the new links here</p>
</div>
</div>
</div>
</model>
<model lang="en">
<div id="newsletter-content">
<div class="center">
<div class="edito">
<h1>Edito</h1>
<p>
Enter the edito here
</p>
</div>

<div class="articles">
<p>Insert the last publication here</p>
</div>
</div>

<div class="sidebar">
<div class="encart">
<h2>Zoom</h2>
<p>Enter the zoom here.</p>
</div>

<div class="encart last">
<h2>Links</h2>
<p>Enter the new links here</p>
</div>
</div>

</div>
</model> Exemple Voici ci-dessous un exemple de lettre d'information pouvant être intégrée et envoyée.
Sommaire automatique généré automatiquement (non éditable) en fonction des titres contenus dans le contenu (2) de la lettre d'information Contenu principal éditable de la lettre d'information. Ici a été insérée une sélection des derniers articles publiés sur le site (via la fonctionnalité d'insertion des dernières publication) Contenu libre éditable Pied de la lettre d'information contenu dans le gabarit (non éditable)


