Afin de pouvoir proposer une visite de bienvenue à un utilisateur, il est nécessaire de définir celle-ci dans la skin du site. Cela se fait en plusieurs temps :
- Chargement des ressources dans la page
- Définition du scénario
- Définition des transitions (optionnel)
- Lancement de la visite guidée
Chargement des ressources dans la page
Il est nécessaire de charger un certain nombre de fichier javascript et css dans la page pour la visite. Pour cela, il vous faut importer le helper XSL fournit par le plugin et appeler les deux templates "welcome-tour-css" et "welcome-tour-js"
<xsl:import href="plugin:welcome-tour://stylesheets/helper.xsl"/>

<xsl:template name="additionnal-css">
    <xsl:call-template name="welcome-tour-css"/>
</xsl:template>

<xsl:template name="additionnal-script">
    <xsl:call-template name="welcome-tour-js"/>
</xsl:template>
Plutôt que de charger directement la SCSS fournie par le plugin, vous pouvez surcharger celle-ci avec votre propre fichier SCSS qui importe celle du plugin. La SCSS du plugin fournie un certain nombre de variable permettant facilement de surcharger les principaux éléments.
Il faudra alors charger directement votre SCSS en veillant à la charger que si le paramètre de site est activé.
Définition du scénario
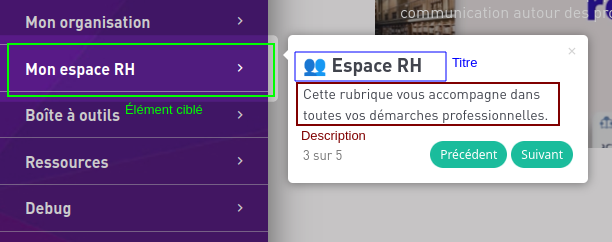
La visite va mettre en valeur une série d'élément de la page en affichant une infobulle d'explication.
Le scénario est défini au moyen d'un tableau JSON dans le fichier "skins/MASKIN/conf/tour-scenario.json"
[{
  "title": "Bienvenue dans votre nouvel intranet.",
  "description": "Nous vous proposons une visite guidée pour vous <a href=\"#\">familiariser</a> avec ce nouvel outil."
}, {
    "selector": "#ametys-cms-zone-documents .events-calendar",
  "title": "Agenda",
    "description": "Par défaut, l’agenda affiche  les événements du jour.<br/>S’il n’y en a pas, il affichera les 4 prochains.<br/><strong>Cliquez sur une date</strong> pour voir tous les événements associés à cette journée."
}]
Chaque étape de la visite est un Objet JSON acceptant les champs suivants :
- title : le titre de l'infobulle (peut contenir du html)
- iconCls : si présent, un élement <span class="icon $iconCls"></span> sera ajouté devant le titre
- description : la description de l'info bulle (peut contenir du html)
- selector : un selecteur CSS permettant de cibler l'élément à surligner. Si aucun sélecteur n'est présent, l'infobulle sera positionnée au milieu de l'écran et aucun élément ne sera surligné. Si un sélecteur est présent mais ne correspond à aucun élément de la page, l'étape sera ignorée.
- selectorFn : plutôt qu'un selecteur CSS, il est possible de fournir une fonction JS qui prends en paramètre la définition de l'étape et renvoie l'élément à surligner. Cette fonction sera appelé avant chaque affichage de l'étape permettant de prendre en compte des informations dynamique (comme la taille de l'écran par exemple).
Définition des transitions (optionnel)
Certains éléments d'une skin peuvent être caché derrière une interaction (par exemple un clic pour ouvrir un menu). Pour pouvoir inclure ces éléments cachés dans votre visite, il va donc être nécessaire de simuler ces interactions. Pour cela vous pouvez redéfinir la méthode "AmetysFront.WelcomeTour.transitionFunction". Cette méthode est appelé à chaque transition entre deux étapes et prends en paramètre la définition de l'étape actuelle et la définition de l'étape cible et dois retourner le délai à attendre avant d'afficher l'étape suivante. Ce délai vous permet d'attendre le temps d'une animation par exemple.
AmetysFront.WelcomeTour.transitionFunction = function(currentStep, nextStep)
{
  // implémentez ici les logiques dont vous avez besoin comme transition
// n'oubliez pas que cette méthode est appelée entre chaque étape.

return 0; // le délai avant de passer à l'étape suivante
}Lancement de la visite guidée
Le scénario de la visite guidée se lance automatiquement à la première visite de l'utilisateur.
Pour que la visite soit fonctionnelle il faut :
- qu'elle soit activée dans les paramètres du site
- qu'un scénario conf/tour-scenario.json soit défini dans la charte graphique
- être sur le front-office
Il est possible de rejouer la visite guidée en rajoutant ?forceTour=true à l'url de la page