Cette documentation décrit comment intégrer les barres d'outils pour la modification front-office (version 1.8.x et supérieures)
Dans sa version 1.8.x, et afin de faciliter les intégrations, le plugin Front-Edition fournit 2 helpers XSL supplémentaires permettant:
- d'insérer une barre d'outils flottante pour les actions liées à la page courante (ajouter un contenu, étiqueter, renommer, déplacer, programmer la page ....)
- d'insérer une barre d'outils d'actions (modifier, étiqueter, valider, dépublier, ...) et d'états lié à un zoneitem de contenu
Sommaire
- Pré-requis
- Barre d'outils pour la page
- Barre d'outil pour les contenus
- Personnalisation graphique des barres d'outils
- Petit plus pour l'édition fo (édition fo sans les dublin core)
Pré-requis
Comme pour tous les autres modes de modification front-office, les scripts de front-edition doivent être chargés et le fichier XSL fournissant les helpers de front-edition doit être importé. Voir les pré-requis du Manuel d'intégration
Par ailleurs, les icônes par défaut utilisées par les barres d'outils sont des icones de FontAwesome 5 Free. Votre charte doit donc inclure fontawesome:
<link rel="stylesheet" href="{ametys:pluginResourceURL('fontawesome-free', 'css/all.css')}" />Barre d'outils pour la page
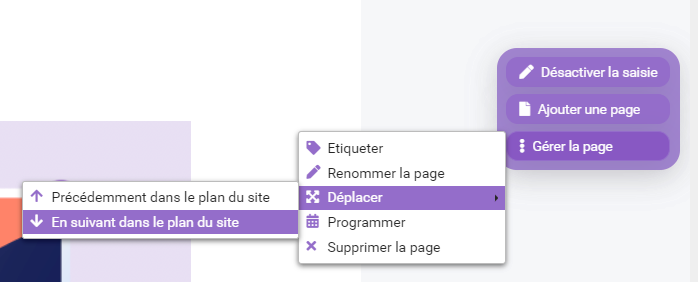
La barre d'outils dédiée à la page courante permet par défaut les actions suivantes:
- Activer/désactiver la saisie (passage en mode edition)
- Ajouter une sous page
- Ajouter un contenu dans une zone
- Gérer la page
- Étiqueter
- Renommer
- Déplacer (au sein de la page parente)
- Programmer
- Supprimer
La barre d'outils se présente sous forme d'une barre flottante sur la droite de la page.
La liste des boutons/menus, leurs libellés et icônes et leur organisation dans la barre d'outils est configurable.
Si un menu comprend une seule action disponible, il se transforme automatiquement en bouton.
Intégration de la barre d'outils
La barre d'outils doit être ajoutée dans le gabarit d'une page en appelant le template XSL suivant:
<xsl:call-template name="ametys-front-edition-page-toolbar"/>
Comme pour tous les autres modes de modification front-office, les scripts de front-edition doivent être chargés et le fichier XSL fournissant les helpers de front-edition doit être importé. Voir les pré-requis du Manuel d'intégration
Par défaut, la barre d'outils fonctionne en "mode edition", c'est à dire que les actions sur la page ne seront disponibles qu'au passage en mode édition.
Sans autre personnalisation, la barre d'outils se présentera donc de la manière suivante:
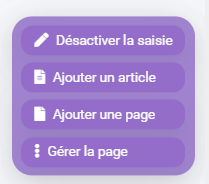
- si le mode "edition" n'est pas actif, elle comprend un seul bouton permettant d'activer ce mode :

- si le mode "edition" est actif, la barre comprend les boutons/menu possibles pour l'utilisateur connecté

Paramétrage du menu "Ajouter un contenu"
L'ajout de contenu dans la page dépend des zones de la page et des types de contenus/workflow du projet.
Pour pouvoir ajouter la possibilité d'ajouter des contenus à la page, il est donc nécessaire de configurer la barre d'outils en listant pour chaque zone de la page, les types de contenus pouvant être rajoutés au moyen du paramètre "add-contents-config".
Ce paramètre se présente sous la forme d'un tableau avec pour chaque entrée:
- contentType : le type de contenu pouvant être ajouté
- zoneName: le nom de la zone dans laquelle il sera ajouté
- label: le libellé du bouton (ex: Ajouter une actualité dans la zone centrale)
- icon: l’icône du bouton. Optionnel.
- workflowName: le workflow associé. Optionnel, par défaut "content"
- initActionId: l'action initial de workflow. Optionnel, par défaut 1
Exemple permettant d'ajouter les actions "Ajouter un article dans la zone centrale" et "Ajouter une actualité dans la zone de gauche" à la barre d'outils
<xsl:call-template name="ametys-front-edition-page-toolbar">
 <xsl:with-param name="add-contents-config">[
   {"contentType": "org.ametys.web.default.Content.article", "icon": "fas fa-file-alt", "zoneName": "default", "label": "Ajouter un article dans la zone centrale"},
     {"contentType": "org.ametys.plugins.news.Content.news", "icon": "fas fa-file-alt", "zoneName": "top-left", "label": "Ajouter une actualité dans la zone de gauche"}
   ]</xsl:with-param>
</xsl:call-template>La barre d'outil intègre alors un menu "Ajouter un contenu" avec la liste des actions définies:

Le libellé des actions peut être une clé i18n:
<xsl:call-template name="ametys-front-edition-page-toolbar">
 <xsl:with-param name="add-contents-config">[
   {"contentType": "org.ametys.web.default.Content.article", "icon": "fas fa-file-alt", "zoneName": "default", "label": "<i18n:text i18n:key="SKIN_FO_TOOLBAR_ADD_CONTENT_TO_DEFAULT" i18n:catalogue="skin.{$skin}"/>"},
     {"contentType": "org.ametys.plugins.news.Content.news", "icon": "fas fa-file-alt", "zoneName": "top-left", "label": "<i18n:text i18n:key="SKIN_FO_TOOLBAR_ADD_CONTENT_TO_TOP_LEFT" i18n:catalogue="skin.{$skin}"/>"}
  ]</xsl:with-param>
</xsl:call-template>Si le paramètre "add-contents-config" n'est constitué que d'une seule action, le menu "Ajouter un contenu" est remplacé par un unique bouton du nom de l'action définie (choisissez un titre court)
Paramétrage du bouton "Ajouter une page"
Il est possible de configurer l'assistant de création de page au moyen du paramètre "add-page-config".
Le format attendu est un JSON correspondant au paramètre "config" de l'assistant de création de page : http://releases.ametys.org/api/release/4.4.x/#!/api/Ametys.plugins.web.page.AddPageWizard-method-open
Par exemple, pour réduire l'assistant au seul choix du type de contenu parmi "Article" et "Actualité de projet", en forçant le gabarit "page" on écrira:
<xsl:call-template name="ametys-front-edition-page-toolbar">
 <xsl:with-param name="add-page-config">{
   "force": true,
   "show-card-type" : false,
   "show-card-content" : true,
   "show-card-tags" : false,
   "default-pagetype" : "template",
   "default-template" : "page",
   "default-pagecontent-type" : "contenttype",
 "pagecontent-card-content-filter": ["org.ametys.web.default.Content.article", "org.ametys.plugins.workspaces.Content.projectNews"],
   "default-contenttype" :  "org.ametys.web.default.Content.article",
   "default-content-title" : "Nouvel article"
   }</xsl:with-param>
</xsl:call-template>Attention, si ce paramètre n'est pas renseigné, la configuration par défaut suivante est appliquée:
{
   'pagetype-template' : true,
   'pagetype-redirection-cms' : true,
   'pagetype-redirection-http' : false,
   'pagetype-blank' : false,
   'pagecontent-card-content-filter' : [
   'org.ametys.plugins.news.Content.news',
   'org.ametys.web.default.Content.article'
   ],
   'pagecontent-service' : false
} Dans cette configuration par défaut, l'assistant de création de page:
- limite le type de page à "Page avec gabarits" (sans restriction de gabarit) ou "Redirection vers une page du site",
- limite les types de contenus à article (org.ametys.web.default.Content.article) et actualité (org.ametys.plugins.news.Content.news),
- ne permet pas de créer une page avec choix d'un service
- permet de sélectionner des étiquettes
Paramétrage de contenu de la barre d'outils
Le libellé et l’icône utilisés pour chaque bouton ou menu peut être surchargée.
La position et l'organisation en bouton/menu de chaque action peuvent également être surchargées.
Pour cela, il est nécessaire de redéfinir le paramètre "items" et de connaitre les identifiants des actions de la barre d'outils.
Les identifiants des actions de la barre d'outil pour la page sont les suivants:
- edition-mode: pour activer/désactiver le mode "edition"
- add-content: pour le menu permettant d'ajouter un contenu à la page
- add-page: pour ajouter une sous-page à la page courante
- tag: pour étiqueter la page
- rename: pour renommer la page
- move: pour déplacer la page au sein de sa page parente
- delete: pour supprimer la page
- schedule-publication: pour programmer la publication de la page
La valeur par du paramètre "items" par défaut est la suivante:
['edition-mode', 'add-content', 'add-page', {type: 'menu', label: "<i18n:text i18n:key="PLUGINS_FRONT_EDITION_TOOLBAR_PAGE_ACTIONS_MENU_LABEL" i18n:catalogue="plugin.front-edition"/>", items: [ 'tag', 'rename', 'move', 'schedule-publication', 'delete']}]Dans cette configuration la barre d'outil comprend dans l'ordre:
- un bouton pour entrer ou sortir du mode edition
- un menu pour ajouter un contenu dans la page
- un bouton pour ajouter une sous-page
- un menu "Gérer la page" avec les autres actions possibles sur la page: étiqueter, renommer, déplacer, programmer, supprimer
Chaque action peut être placée indifféremment dans un menu, sous menu ou directement à la racine de la barre d'outils.
Pour surcharger le libellé et/ou l’icône d'une action, on écrira au lieu de l'identifiant de l'action: {type: 'tag', label: "Libellé surchargé", icon: "fas fa-file"}
Pour surcharger le libellé et/ou le contenu d'un menu, on écrira : {type: 'menu', label: "Plus..", items: ['tag', 'rename']}
Le libellé des actions/menu peut être une clé i18n: {type: 'menu', label: "<i18n:text i18n:key="SKIN_TOOLBAR_MENU_LABEL" i18n:catalogue="skin.{$skin}/>", items: ['tag', 'rename']}
Exemples de personnalisation
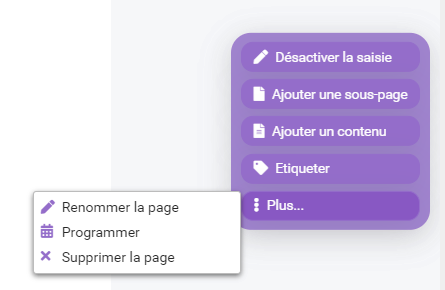
Voici un exemple de personnalisation permettant de ré-organiser la barre d'outil de la manière suivante:
- le bouton "Ajouter une page" est remonté d'un niveau et renommé "Ajouter une sous-page"
- l'action "Etiqueter" est ajouté directement dans la barre d'outil (sorti du menu)
- le menu "Gérer la page" est renommé "Plus..."
- le déplacement de la page n'est plus rendu possible (suppression de l'action 'move')
<xsl:call-template name="ametys-front-edition-page-toolbar">
 <xsl:with-param name="items">['edition-mode', {type: 'add-page', label: 'Ajouter une sous-page'}, 'add-content', 'tag', {type: 'menu', label: "Plus...", items: ['rename', 'schedule-publication', 'delete']}]</xsl:with-param>
  <xsl:with-param name="add-contents-config">[
   {"contentType": "org.ametys.web.default.Content.article", "icon": "fas fa-file-alt", "zoneName": "default", "label": "<i18n:text i18n:key="SKIN_FO_TOOLBAR_ADD_CONTENT_TO_DEFAULT" i18n:catalogue="skin.{$skin}"/>"},
     {"contentType": "org.ametys.plugins.news.Content.news", "icon": "fas fa-file-alt", "zoneName": "top-left", "label": "<i18n:text i18n:key="SKIN_FO_TOOLBAR_ADD_CONTENT_TO_TOP_LEFT" i18n:catalogue="skin.{$skin}"/>"}
  ]</xsl:with-param>
</xsl:call-template>
Mode edition
La barre d'outil de la page pour être insérer en mode edition seulement ou pas.
Par défaut le paramètre "edition-mode-only" est à true(), les actions sur la page ne sont donc disponible que si on passe en mode edition.
Il est possible de positionner ce paramètre à false() pour que la barre d'outil et les actions soient disponibles en dehors du mode edition.
Pour cela il convient de surcharger le paramètre "items" et d'enlever l'action "edition-mode" de la barre d'outils.
A noter que la programmation de la page ne peut être disponible qu'en mode edition.
Barre d'outil pour les contenus
La barre d'outils pour un contenu est constitué par défaut :
- de l'état courant du contenu précédé des états ayant menés à cet état (ex: Proposé -> Validé)
- de la liste des actions de workflow possibles (proposer, valider, dépublier, ..)
- des actions possibles sur le contenu : modifier, étiqueter, déplacer au sein de la zone, retirer le contenu de la zone
La liste des actions dépend des droits de l'utilisateur et de l'état courant du contenu.
La liste des boutons/menus, leurs libellés et icônes et leur organisation dans la barre d'outils est configurable.
Si un menu comprend une seule action disponible, il se transforme automatiquement en bouton.
Intégration de la barre d'outils
La barre d'outils des contenus doit être ajoutée nécessairement dans le gabarit d'une page en appelant le template XSL "ametys-front-edition-content-toolbar" depuis le template "zone-item-before".
Exemple d'intégration utilisant la barre d'outils avec les boutons/menus par défaut pour la zone principale, et une barre d'outils plus réduite pour les zones secondaires (bouton Modifier avec une simple icone et regroupement de toutes les actions dans un seul menu):
<xsl:template name="zone-item-before">
  <xsl:param name="position"/>
  <xsl:param name="count"/>
  <xsl:param name="zone-name"/>
  <xsl:param name="level"/>
  <xsl:param name="inherited"/>
  <xsl:param name="id"/>
  <xsl:param name="type"/>
  <xsl:param name="content-id"/>
  <xsl:param name="service"/>
  <xsl:param name="content-type"/>

  <xsl:if test="$type = 'CONTENT'">
    <xsl:choose>
    <xsl:when test="$zone-name = 'aside-top' or $zone-name = 'aside-bottom'">
          <!-- Small version of toolbar -->
          <xsl:call-template name="ametys-front-edition-content-toolbar">
            <xsl:with-param name="content-id" select="$content-id"/>
            <xsl:with-param name="zone-name" select="$zone-name"/>
            <xsl:with-param name="zone-item-id" select="@id"/>
            <xsl:with-param name="items">[{type: 'edit', label: ''}, 'current-step', {type: 'menu', label: '', icon: 'fas fa-ellipsis-v', items: ['workflow-action-3', 'workflow-action-4', 'workflow-action-7', 'workflow-action-10', 'tag', 'move', 'remove']}]</xsl:with-param>
          </xsl:call-template>
      </xsl:when>
      <xsl:otherwise>
          <!-- Default toolbar for default zone -->
          <xsl:call-template name="ametys-front-edition-content-toolbar">
            <xsl:with-param name="content-id" select="$content-id"/>
            <xsl:with-param name="zone-name" select="$zone-name"/>
            <xsl:with-param name="zone-item-id" select="@id"/>
          </xsl:call-template>
      </xsl:otherwise>
    </xsl:choose>
  </xsl:if>
</xsl:template>La barre d'outil ne doit jamais être intégré directement dans le rendu d'un contenu, les XSL de contenus étant mise en cache.
Configuration de la barre d'outil
L'appel au helper XSL possède plusieurs paramètres. Les 3 premiers sont obligatoire, les suivants possèdent tous une valeur par défaut pouvant être surchargée:
- content-id : identifiant du contenu
- zone-item-id: identifiant du zone item
- zone-name: nom de la zone parente
- edit-view-name: nom de la vue lorsque l'on veut modifier le contenu dans une boite de dialogue. Par défaut "defaut-edition"
- items: liste des boutons/menus et leur organisation dans la toolbar
- workflow-actions: liste des actions de workflow autorisées depuis le front-office
- workflow-steps: liste des états de workflow avec leur type
- excluded-actions-outside-edition-mode: identifiants des actions de workflow ne devant pas apparaitre en dehors du mode edition. Par défaut [10], pour l'action de dépublication
- edition-mode-only: true() pour afficher afficher la toolbar uniquement en mode edition, false() sinon. Par défaut à true().
Paramétrage du contenu de la barre d'outils (paramètre "items")
Ce paramètre permet à la fois de définir les boutons/actions disponibles et leur organisation (bouton/menu, position) dans la barre d'outils.
Les identifiants de bouton connus sont les suivants:
- current-step : pour afficher un bouton non cliquable représentant l'état courant. Uniquement présent en mode "edition"
- status-history: pour afficher les états précédents l'état courant, significatifs pour expliquer l'état courant (ex: le contenu a été proposé avant d'être validé)
- workflow-actions: pour afficher toute la liste des actions de workflow disponibles pour l'utilisateur et le contenu courant
- worflow-action-X: pour afficher un bouton pour effectuer l'action X
- edit: bouton "Modifier" pour modifier le contenu dans une popup
- tag: bouton pour "Étiqueter" le contenu
- move-up: bouton pour déplacer le contenu vers le haut (au sein de sa zone)
- move-down: bouton pour déplacer le contenu vers le bas (au sein de sa zone)
- move: raccourcis pour insérer un menu avec les actions move-up et move-down
- remove: bouton pour supprimer le contenu de la zone
- menu: mot clé pour organiser les actions dans un menu
La valeur par défaut de ce paramètre est:
['edit', 'status-history', 'current-step', {type: 'menu', items: ['workflow-action-3', 'workflow-action-4', 'workflow-action-7']}, 'workflow-action-10', {type: 'menu', label: '<i18n:text i18n:key="PLUGINS_FRONT_EDITION_TOOLBAR_MORE_MENU_LABEL" i18n:catalogue="plugin.front-edition"/>', items: ['tag', 'move', 'remove']}]Dans cette configuration la barre d'outil affiche dans l'ordre:
- un bouton "Modifier" pour modifier le contenu dans une popup
- l'état courant du contenu précédé des états du même type ayant mené à cet état
- un menu "Actions" avec les actions Proposer, Valider et Refuser (seules les actions disponibles pour l'état et l'utilisateur courant sont visibles)
- un bouton "Dépublier" (visible uniquement en mode edition et si une version en ligne existe)
- un menu "Plus..." avec les actions Étiqueter, Déplacer et Retirer le contenu


Si cette organisation par défaut convient, le helper peut être appelé sans préciser ce paramètre.
Chaque action peut être placée indifféremment dans un menu, sous menu ou directement à la racine de la barre d'outils.
Pour surcharger le libellé et/ou l’icône d'une action, on écrira au lieu de l'identifiant de l'action: {type: 'tag', label: "Libellé surchargé", icon: "fas fa-file"}
Pour surcharger le libellé et/ou le contenu d'un menu, on écrira : {type: 'menu', label: "Plus..", items: ['tag', 'remove']}
Le libellé des actions/menu peut être une clé i18n: {type: 'menu', label: "<i18n:text i18n:key="SKIN_TOOLBAR_MENU_LABEL" i18n:catalogue="skin.{$skin}/>", items: ['tag', 'remove']}
Exemple de personnalisation:
Pour par exemple déplacer l'action Étiqueter directement dans la barre d'outils avec un bouton sans libellé à coté de "Modifier", et mettre toutes les actions de workflow dans un sous-menu "Cycle de vie" du menu "Plus..." entre les actions Déplacer et Retirer le contenu, on écrira
['edit', {type: 'tag', label: ''}, 'current-step', {type: 'menu', label: '<i18n:text i18n:key="PLUGINS_FRONT_EDITION_TOOLBAR_MORE_MENU_LABEL" i18n:catalogue="plugin.front-edition"/>', items: ['move', {type: 'menu', label: 'Cycle de vie', items: ['workflow-actions']}, 'remove']}]
Paramétrage des actions de workflow (paramètre "workflow-actions")
Par défaut les actions de workflow autorisées depuis le front-office sont celles du workflow standard: proposer (3), valider (4), refuser (7) et dépublier (10). Elles sont disponible avec une icône par défaut pour chacune d'elle.
Lors de l'utilisation de "workflow-actions" dans le paramètre "items", la liste des actions disponibles dépend :
- de la liste des actions de workflow autorisées dans ce paramètre "workflow-actions"
- des droits de l'utilisateur
- de l'état courant du contenu
Si une action de workflow n'est pas disponible (droit insuffisant, état du contenu qui ne le permet pas) le bouton n'apparait pas.
Il est possible de surcharger la liste des actions de workflow disponibles par défaut en redéfinissant le paramètre "workflow-actions"
La valeur attendue est un tableau contenant les identifiants des actions de workflow ou un objet représentant l'action de workflow avec les surcharges éventuelles.
Exemples:
- [2, 4, 7] : pour restreindre la liste des actions disponibles aux actions Proposer, Valider et Refuser en conservant les libellés et icône par défaut
- [2, 4, {"id": 7, "icon":"fas fa-times"}, {"id": 10, "label": "Dépublier la version en ligne"}] : pour surcharger l’icône par défaut pour l'action de refus (7) et le libellé pour l'action de dépublication (10)
Attention, ce paramètre transitant vers le serveur, la syntaxe avec l'utilisation des doubles quotes " dans le JSON doit être respecté
Paramétrage des états et leur type (paramètre "workflow-steps")
Pour les boutons d'état, la barre d'outil possède 3 types d'état:
- neutral: pour un bouton qui apparaît en gris avec une icône relative à l’état (ex: Brouillon)
- positive: pour un bouton qui apparaît en vert avec une coche (ex: Proposé, Validé)
- negative: pour un bouton qui apparaît en rouge avec une croix (pas d'état négatif dans le workflow standard)
La valeur par défaut de ce paramètre correspond au workflow standard pour les états Brouillon (1), Proposé (2) et Validé (3) :
{"1": {"type": "neutral", "icon": "fas fa-file-alt"}, "2": {"type": "positive"}, "3": {"type": "positive"}}
Il convient de définir une icône pour les états neutres.
Pour définir un libellé différent du libellé définit dans le workflow, on utilisera par exemple "1": {"type": "neutral", "label": "En cours de modification", "icon": "fas fa-file-alt"}
L'état courant n'est affiché qu'en mode "edition".
Attention, ce paramètre transitant vers le serveur, la syntaxe avec l'utilisation des doubles quotes " dans le JSON doit être respecté
Personnalisation graphique des barres d'outils
Le plugin front-edition apporte une scss par défaut pour le rendu graphique des barres d'outils.
La barre d'outil de la page est une barre flottante, apparaissant à droite de la page.
Au scroll la barre d'outil est rétrécie, ne faisant apparaitre que les icones des boutons/menus

Elle est redéployée au clic.
Les boutons d'actions sont par défaut violets et aux coins arrondis.
Les boutons d'état sont gris, vert ou rouge.
La police utilisée est "Roboto, sans serif".
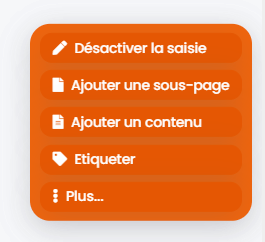
Pour surcharger la couleur principale et la police utilisée par les barres d'outils, il suffit d'importer un fichier SCSS avec par exemple:
$ametys-front-edition-primary: #e8590c;
$ametys-front-edition-font-family: "Poppins Medium",sans-serif;;

@import "plugin:front-edition://resources/scss/toolbar.scss";
La SCSS doivent être chargée après celle de front-edition. Importez-la après l'appel au template "ametys-front-edition-head".


Les variables SCSS disponibles et pouvant être surchargées sont les suivantes:
 $ametys-front-edition-primary: #9575cd !default;
 $ametys-front-edition-font-family: Roboto, sans-serif !default;
 $ametys-front-edition-font-size: 14px !default;
 $ametys-front-edition-btn-bgcolor: $ametys-front-edition-primary !default;
 $ametys-front-edition-btn-color: #fff !default;
 $ametys-front-edition-menu-color: #2f2f2f !default;
 $ametys-front-edition-btn-neutral-bgcolor: #e5e7eb !default;
 $ametys-front-edition-btn-neutral-color:#374151 !default;
 $ametys-front-edition-btn-positive-bgcolor: #deedd5 !default;
 $ametys-front-edition-btn-positive-color:#6fbe44 !default;
 $ametys-front-edition-btn-negative-bgcolor: #ff9595 !default;
 $ametys-front-edition-btn-negative-color:#fc7d85 !default;
 $ametys-front-edition-disabled-color:#c1c1c1 !default;
Vous pouvez aller plus loin dans la personnalisation en redéfinissant vous même les classes CSS utilisées par les barres d'outils.
Petit plus pour l'édition fo (édition fo sans les dublin core)
Il est possible de créer une vue des contenus pour l'édition FO afin d'éviter d'avoir les propriétés contacts et dublin core.
Exemple : WEB-INF\param\content-types\_override\org.ametys.plugins.news.Content.news.xml
<cms:content-type xmlns:cms="http://www.ametys.org/schema/cms">
     <!-- edition-fo view -->
     <cms:metadata-set name="edition-fo" type="view">
         <cms:metadata-ref name="title" />
         <cms:metadata-ref name="document-subtitle" />
         <cms:metadata-ref name="start-date" />
         <cms:metadata-ref name="end-date" />
         <cms:metadata-ref name="illustration">
             <cms:metadata-ref name="image" />
             <cms:metadata-ref name="alt-text" />
         </cms:metadata-ref>
         <cms:metadata-ref name="abstract" />
         <cms:metadata-ref name="content" />
         <cms:label i18n="true">plugin.web:PLUGINS_WEB_VIEW_MAIN</cms:label>
         <cms:description i18n="true">plugin.web:PLUGINS_WEB_VIEW_MAIN_DESC</cms:description>
     </cms:metadata-set>
</cms:content-type>
Dans le template zone-item-before ajouter un paramètre edit-view-name avec la valeur le nom de la vue. Attention il faut que cette vue soit dispo sur l'ensemble des types de contenus modifiable en FO.
Exemple
<xsl:call-template name="ametys-front-edition-content-toolbar">
             <xsl:with-param name="content-id" select="$content-id"/>
             <xsl:with-param name="zone-name" select="$zone-name"/>
             <xsl:with-param name="zone-item-id" select="@id"/>
             <xsl:with-param name="edit-view-name">edition-fo</xsl:with-param>
</xsl:call-template>