- Gérer les dossiers
- Créer un fichier de définition
- Modifier la description de l'extraction
- Modifier un fichier de définition
- Créer un composant de type thesaurus
- Créer un composant de type requête
- Créer un composant de type compteur
- Créer un composant de type table de correspondance
- Les clauses
- Ajouter des variables de clauses
- Ajouter des variables pour les colonnes optionnelles
- Modifier un nœud
- Supprimer un nœud
- Sauvegarder ou annuler les modifications
- Renommer un fichier de définition
- Supprimer un fichier de définition
- Actions sur le partage des extractions
Gérer les dossiers
Les extractions peuvent être enregistrées dans des dossiers ou sous-dossiers.
Les boutons de la catégorie "Dossier" sont disponibles :
 permet de créer un nouveau dossier sous le nœud sélectionné
- Les actions
 Renommer
  Supprimer et sont également disponibles.
Créer un fichier de définition
Dans l'onglet 'Extractions', après avoir sélectionné un dossier, cliquez sur le bouton 'Nouveau' :

Renseignez le nom du fichier de définition, un nouveau fichier est créé dans le répertoire WEB-INF/param/extraction/definitions/<Dossier>.
L'outil 'Détails de l'extraction' s'ouvre, la racine de l'arbre est présente, ainsi que les nœuds qui permettent de définir des variables de clauses et des colonnes optionnelles.
Vous pouvez maintenant créer les composants de votre extraction.
Modifier la description de l'extraction
Dans l'onglet 'Extractions', cliquez sur le bouton 'Modifier la description' :

L'outil de modification de contenu s'ouvre et vous permet de modifier la description de l'extraction.
Modifier un fichier de définition
Créer un composant de type thesaurus
Dans l'outil 'Détails de l'extraction', sélectionnez un nœud et cliquez sur le bouton 'Thesaurus' de l'onglet 'Extractions' :

Une boîte de dialogue s'affiche vous permettant de renseigner les informations nécessaires à la création d'un composant de type thesaurus :
- Nom du tag : Vous pouvez choisir le nom de l'élément XML qui sera créé dans le fichier de résultats pour ce composant. Ce nom doit respecter les règles de nommage des éléments XML. Seuls certains caractères sont autorisés comme les lettres, les chiffres, les tirets, ... Ce champ n'est pas obligatoire, s'il n'est pas renseigné, on utilisera le terme 'thesaurus'.
- Thesaurus : Liste déroulante avec les noms des thesaurii disponibles. Choisissez le thesaurus sur lequel rechercher des termes. Ce champ est obligatoire.
- Microthesarus : Liste déroulante avec les noms des microthesaurii disponibles pour le thesaurus choisi. Choisissez le microthesaurus sur lequel rechercher des termes. Si vous changez de thesaurus, ce champ se réinitialise. Ce champ est obligatoire.
- Niveau maximum : Profondeur maximum à laquelle rechercher les termes spécifiques. L'autopostage descendant permettra de remonter les contenus correspondant aux termes spécifiques de niveaux inférieurs.
Un nœud Thesaurus est créé dans l'arbre, sous le nœud sélectionné.
Créer un composant de type requête
Dans l'outil 'Détails de l'extraction', sélectionnez un nœud et cliquez sur le bouton 'Requête' de l'onglet 'Extractions' :

Une boîte de dialogue s'affiche vous permettant de renseigner les informations nécessaires à la création d'un composant de type requête :
- Nom du tag : Vous pouvez choisir le nom de l'élément XML qui sera créé dans le fichier de résultats pour ce composant. Ce nom doit respecter les règles de nommage des éléments XML. Seuls certains caractères sont autorisés comme les lettres, les chiffres, les tirets, ... Ce champ n'est pas obligatoire, s'il n'est pas renseigné, on utilisera le terme 'query'.
- Clauses : Champ texte contenant une requête solr. Vous pouvez renseigner plusieurs requêtes, en cliquant sur le bouton '+'. Pour plus d'informations, Regarder les explications sur les clauses.
- Groupes : Vous pouvez choisir de grouper les résultats d'une requêtes en fonctions des champs des contenus remontés. Les champs sont séparés par des virgules. L'autocomplétion vous permettra de renseigner les champs disponibles pour les types de contenu sélectionnés.
- Type de requête : Spécifiez si vous souhaitez utiliser une requête enregistrée ou créer la requête de toutes pièces.
En fonction du type de requête sélectionné, de nouvelles informations doivent être renseignées :
|
Si vous souhaitez utiliser une requête sauvegardée :
| |
|
Si vous souhaitez créer une requête de toutes pièces :
|
Un nœud Requête est créé dans l'arbre, sous le nœud sélectionné.
Créer un composant de type compteur
Dans l'outil 'Détails de l'extraction', sélectionnez un nœud et cliquez sur le bouton 'Compteur' de l'onglet 'Extractions' :

Une boîte de dialogue s'affiche vous permettant de renseigner les informations nécessaires à la création d'un composant de type compteur.
Un composant de type compteur correspond à un composant de type Requête. Les paramètres à renseigner sont globalement les mêmes.
La différence vient du fait que pour un composant de type compteur, on ne remonte que le nombre de contenus renvoyés par la requête. Aucun paramètre correspondant aux colonnes et au tri ne sont donc demandés.
Un nœud Compteur est créé dans l'arbre, sous le nœud sélectionné.
Créer un composant de type table de correspondance
Dans l'outil 'Détails de l'extraction', sélectionnez un nœud et cliquez sur le bouton 'Requête de correspondance' de l'onglet 'Extractions' :

Une boîte de dialogue s'affiche vous permettant de renseigner les informations nécessaires à la création d'un composant de type requête de correspondance.
Un composant de type requête de correspondance correspond à un composant de type Requête. Les paramètres à renseigner sont globalement les mêmes.
La différence vient du fait que les contenus renvoyés par la requête d'un composant de type requête de correspondance ne sont pas affichés. La requête de correspondance est invisible. De ce fait, aucun paramètre correspondant aux groupe, aux colonnes et au tri ne sont demandés. Le paramètre concernant le nom du tag n'est pas demandé non plus.
Un nœud Requête de correspondance est créé dans l'arbre, sous le nœud sélectionné.
Les clauses
Pour les join solr, il faut toujours mettre des guillements autour du q=
Une clause peut contenir des variables, définies dans un autre nœud de l'arbre. Regarder l'ajout de variables de clause. Le nom de la variable est mise entre accolades, précédées du signe '$'. Exemple :
${le_nom_de_ma_variable}Une clause peut également servir à faire une jointure avec les composants parents. Le lien vers le composant parent est mis entre accolades, précédé du signe '$'. Utilisez la notation '..' pour remonter au parent direct. Pour remonter aux parents plus lointains, utilisez autant de fois que nécessaire "../". Vous pouvez également indiquer le nom d'un attribut du parent ciblé. Voici quelques exemples :
Contenu du parent direct :
${..}Contenu du parent N+4 :
${../../../..}Attribut attribute_A du contenu du parent direct :
${../attribute_A}Attribut attribute_B du contenu lié par l'attribut attribute_A du contenu du parent N+2 :
${../../attribute_A.attribute_B}Lors de l'utilisation d'une variable de clause multivaluée, lors d'une jointure sur un attribut multivaluée ou lors de l'autopostage pour les thesaurii, la requête spécifiée peut être modifiée avant son exécution pour tester toutes les valeurs attendues. Exemple, la requête suivante :
my_attribute_A:${../my_parent_multivalued_attribute_A}devient
my_attribute_A:my_parent_attribute_A_value_1 OR my_attribute_A:my_parent_attribute_A_value_2 OR ...
Vous pouvez ajouter des groupes qui permettent de ne dupliquer que certaines parties des requêtes et non les requêtes entière. Cela permet que ces requêtes, exécutées un certain nombre de fois soient beaucoup plus performantes. Le groupe est mis entre accolades, précédé du signe '#' :
#{my_attribute_A:${../my_parent_mutlivalued_attribute_A}} OR {!ametys join=linkContent->my_attribute_B q='%{#{id:"${../my_parent_multivalued_attribute_B}"}}'}devient
(my_attribute_A:my_parent_attribute_A_value_1 OR my_attribute_A:my_parent_attribute_A_value_2 OR ...) OR ({!ametys join=linkContent->my_attribute_B q='(id:"my_parent_attribute_A_value_1 OR id:my_parent_attribute_A_value_2 OR ...")'})Plusieurs règles sont à connaître :
- S'il n'y a pas de groupe dans la clause, la clause elle-même est considérée comme un groupe.
- Aucune variable ne peut être utilisée en dehors d'un groupe.
- A l'intérieur d'un groupe, on peut utiliser plusieurs fois la même variable.
- A l'intérieur d'un groupe, on ne peut pas utiliser plusieurs variables différentes.
Ajouter des variables de clauses
Une variable de clauses permet de fournir une valeur à l'exécution de l'extraction. La variable peut être utilisée dans les clauses des composants via la notation ${maVariable}. Cette notation sera remplacée à l'exécution par la valeur fournie.
Le nœud Variable de clauses contient toutes les variables de clauses. Il est automatiquement créé lors de la création du fichier de définition.
Dans l'outil 'Détails de l'extraction', sélectionnez le nœud Variables de clause et cliquez sur le bouton 'Modifier' de l'onglet 'Extractions'. Une boîte de dialogue s'affiche vous permettant d'ajouter des variables de clause ou de modifier les variables existantes :
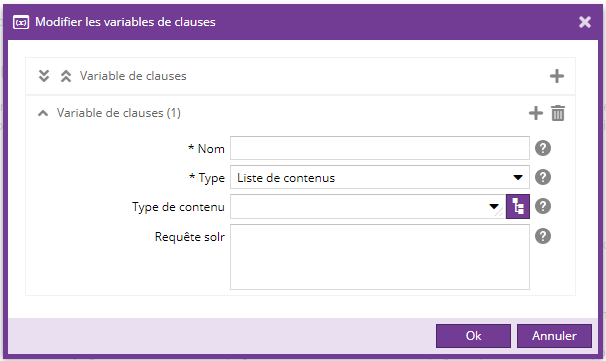
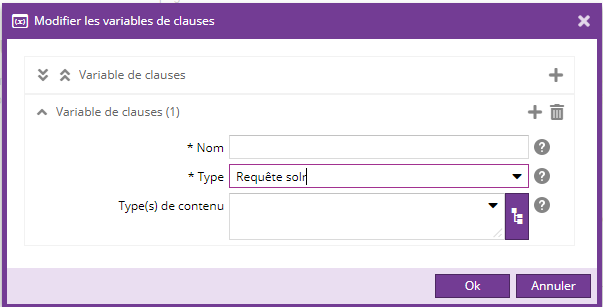
- Nom : nom de la variable, à utiliser ensuite dans les clauses.
- Type : type de variable de clause. Cela correspond au type de valeur à fournir lors de l'exécution de l'extraction. On peut fournir soit une liste de contenu, soit une requête solr.
- Pour le type Liste de contenus : il est possible, mais pas obligatoire, de fournir un type de contenu et/ou une requête solr permettant de restreindre les valeurs (contenus) saisis lors de l'exécution
- Pour le type Requête solr : il est possible, mais pas obligatoire, de fournir un ou plusieurs types de contenu. La requête solr saisie lors de l'exécution prendra en compte ces types
Avant la version 1.12.0, on ne pouvait pas restreindre la liste des contenus à l'aide d'une requête solr, on ne pouvait que fournir un type de contenu. De plus, le Type de variable Requête Solr n'existait pas.
Vous pouvez ajouter des variables en cliquant sur le bouton '+'.
Ajouter des variables pour les colonnes optionnelles
Pour rendre une colonne optionnelle, on utilise des variables. A l'exécution, l'utilisateur choisit pour chaque variable si les colonnes qui dépendent de cette variable seront affichées ou non. Pour qu'une colonne dépende d'une variable, il suffit d'indiquer le nom de la variable entre parenthèses dans le champ Colonnes. Exemple :
attribute_A (optianalA), attribute_B
Le nœud Colonnes optionnelles contient toutes ces variables. Il est automatiquement créé lors de la création du fichier de définition.
Dans l'outil 'Détails de l'extraction', sélectionnez le nœud Colonnes optionnelles et cliquez sur le bouton 'Modifier' de l'onglet 'Extractions'. Une boîte de dialogue s'affiche, vous permettant de créer une ou plusieurs variables pour les colonnes optionnelles :
- Noms : nom des variables pour les colonnes optionnelles, séparées par une virgule.
Modifier un nœud
Dans l'outil 'Détails de l'extraction', sélectionnez un nœud et cliquez sur le bouton 'Modifier' de l'onglet 'Extractions' :
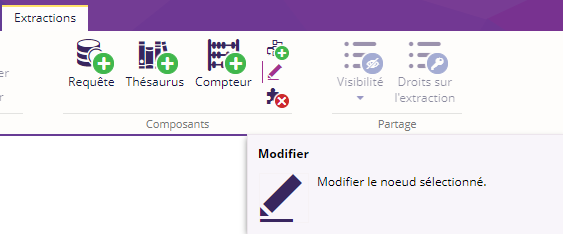
Une boîte de dialogue s'affiche vous permettant de modifier les informations du nœud sélectionné. Les champs de la boîte de dialogue dépendent du nœud sélectionné.
Supprimer un nœud
Dans l'outil 'Détails de l'extraction', sélectionnez un nœud et cliquez sur le bouton 'Supprimer' de l'onglet 'Extractions' :
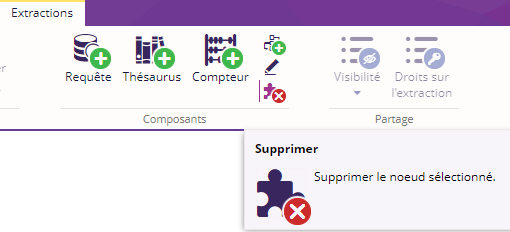
Après confirmation de votre part, le nœud sélectionné et tous ses enfants sont supprimés.
Sauvegarder ou annuler les modifications
Lorsque vous effectuez une modification sur une extraction, une étoile s'affiche dans le nom de l'outil 'Détails de l'extraction' correspondant. Vous pouvez sauvegarder les modifications apportées à l'extraction en cliquant sur le bouton 'Sauvegarder'  de l'onglet 'Extractions' :
Sinon, vous pouvez annuler  ces modifications en cliquant sur le bouton 'Annuler' de l'onglet 'Extractions' :
Renommer un fichier de définition
Dans l'outil 'Extractions', sélectionnez un fichier de définition et cliquez sur le bouton 'Renommer' de l'onglet 'Extractions' :

Vous pouvez également cliquer sur le bouton 'Renommer' depuis l'outil 'Détails de l'extraction'.
Supprimer un fichier de définition
Dans l'outil 'Extractions', sélectionnez un fichier de définition et cliquez sur le bouton 'Supprimer' de l'onglet 'Extractions' :

Actions sur le partage des extractions
Avant la version 1.7.0
Les actions sur le partage des extractions sont disponibles sous la rubrique "Partage",
et sont accessibles quand une extraction est sélectionnée.
- Le bouton Visibilité
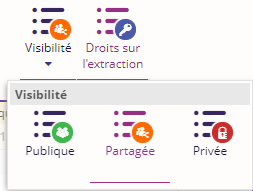 permet de modifier la visibilité d'une extraction:
- Publique
 : l'extraction peut être modifiée et/ou exécutée par l'ensemble des utilisateurs
- Partagée
 : l'extraction peut être modifiée et/ou exécutée uniquement aux utilisateurs choisis via le bouton "Droits sur la requête", présenté ci-dessous.
- Privée
 : l'extraction ne peut être modifiée et exécutée que par l'utilisateur courant.
Droits sur l'extraction
 Ce bouton est disponible uniquement si l'extraction sélectionnée possède une visibilité partagée et permet d'ouvrir l'outil "Droits sur l'extraction"
Outil
Cet outil liste les utilisateurs ou groupes ayant accès en lecture et en lecture/écriture sur l'extraction sélectionnée.

Les utilisateurs ou groupes ayant accès en lecture pourront uniquement visualiser l'extraction, sans pouvoir la modifier.
Les utilisateurs ou groupes ayant accès en lecture/écriture pourront visualiser l'extraction, et également la modifier.
Actions
Les actions de l'outil "Droits sur l'extraction"  sont disponibles dans un onglet "Partage".
 Ce bouton est disponible à partir du moment où au moins une catégorie (lecture ou lecture/écriture) est sélectionnée.
Il permet d'ajouter un ou plusieurs utilisateurs à la/les catégorie(s) sélectionnées, et donc ajouter le droit correspondant.
Une fenêtre s'ouvre et permet de sélectionner les utilisateurs à qui donner le droit correspondant.
-
 Ce bouton est disponible à partir du moment où au moins une catégorie (lecture ou lecture/écriture) est sélectionnée.
Il permet d'ajouter un ou plusieurs groupes à la/les catégories sélectionnées, et donc ajouter le droit correspondant.
Une fenêtre s'ouvre et permet de sélectionner les groupes à qui donner le droit correspondant.
 Ce bouton est disponible à partir du moment où au moins un utilisateur ou groupe est sélectionné.
Il permet de supprimer cet utilisateur ou ce groupe de la catégorie sélectionnée.
Une fenêtre pop-up s'ouvre pour demander confirmation.
A partir de la version 1.7.0
Le bouton "Limiter l'accès" est disponible sur un répertoire ou une extraction.
Ce bouton ouvre l'outil de gestion ci-dessous :
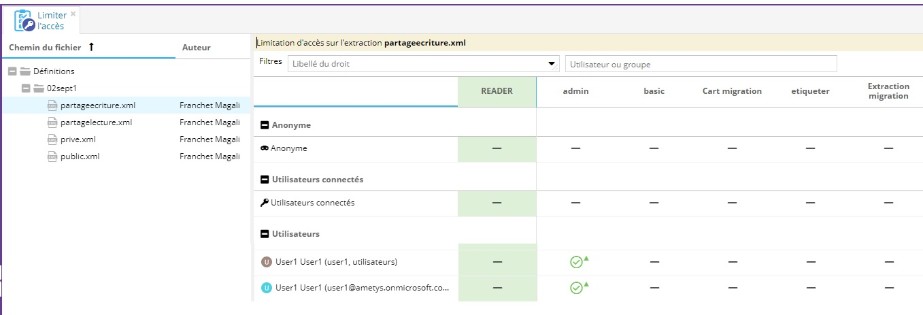
Il est possible de retrouver ce même outil en cliquant sur le bouton "Utilisateurs, Groupes et Droits"/ "Affectation de profils" puis en sélectionnant le contexte "Extraction".
Cet outil permet d'assigner des droits aux répertoires ou aux requêtes, selon les principes suivants :
- Je vois un dossier si :
- J'ai le droit d’écriture ou lecture dessus
- J'ai le droit d’écriture ou lecture sur un sous dossier
- J'ai le droit d’écriture ou lecture sur une sous requête
- J'ai une sous requête que j'ai crée moi-même
- Je peux renommer un dossier si :
- J’ai le droit d’écriture dessus et le parent direct
- Je peux supprimer un dossier si :
- J'ai le droit d’écriture dessus, sur tous les enfants et sur le parent direct
- Je peux déplacer un dossier si :
- J'ai le droit d’écriture dessus, sur tous les enfants, sur le parent direct et sur le dossier cible
- Je peux créer un dossier si :
- J'ai le droit d’écriture dessus, sur tous les enfants, sur le parent direct et sur le dossier cible
- Je peux ajouter une requête si :
- J’ai le droit d’écriture sur le parent direct
- Je peux supprimer/modifier une requête si :
- C’est ma requête
- Si j’ai le droit d’écriture sur cette requête et sur son parent direct
- Je peux déplacer une requête si :
- C’est ma requête et j'ai le droit d’écriture sur le dossier cible
- Si j’ai le droit d’écriture sur cette requête, sur son parent direct et sur le dossier cible
Tableau récapitulatif:

ID*: identifiant interne utilisé dans les messages de bus et les boutons


