L'éditeur en ligne des champs riches vous permet de mettre en forme votre contenu et d'y insérer un grand nombre d'objets (images, tableaux, symboles, code HTML, données fusionnées, …).
Il se décompose en deux grandes zones : "Caractère et paragraphe" et "Insertion".
- Zone "Caractère et paragraphe"
- Zone "Insertion"
Zone "Caractère et paragraphe"
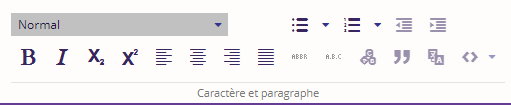
Cette zone permet de présenter et mettre en forme le contenu. On y trouve les fonctionnalités permettant de gérer :
- les niveaux de titres,
- les styles de paragraphes
- les listes
- la mise en forme basique
- des fonctionnalités d’accessibilité
- etc...
Styles
Les styles des différents éléments (paragraphes, titres, listes à puces, listes numérotées) peuvent être définis par la charte du site web.
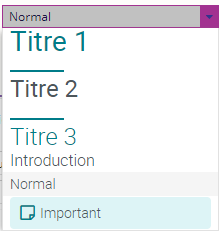
Titres et styles de paragraphes
|
Sélectionner le texte du contenu et choisir un style dans la liste :
|
|
Pour des raisons graphiques, d’accessibilité et de référencement, les titres doivent respecter la hiérarchie sémantique : un titre de niveau 2 ne peut être placé avant un titre de niveau 1. Si tel est le cas, une icône ![]() ainsi qu'un liseré jaune vous en informeront. Au survol de l'icône, ce message précise la raison :
ainsi qu'un liseré jaune vous en informeront. Au survol de l'icône, ce message précise la raison : 
Mise en forme
![]()
Pour chaque style, une bulle d'aide explicative s'affiche lors du survol du bouton avec la souris.
Les styles de bases sont proposés :
|
Bouton |
Style |
|
|
Gras |
|
|
Italique |
|
|
Indice |
|
|
Exposant |
|
|
Aligner le texte à gauche |
|
|
Centrer le texte |
|
|
Aligner le texte à droite |
|
|
Justifier le texte |
Pour améliorer l’accessibilité et l'ergonomie de votre site, veuillez éviter autant que possible de justifier votre texte.
De plus, quelques fonctionnalités avancées (accessibilité, glossaire etc...) sont disponibles :
|
Bouton |
Style |
|
|
Signaler une abréviation |
|
|
Signaler un acronyme |
|
|
Ajouter au glossaire |
|
|
Signaler une citation |
|
|
Signaler un changement de langue |
Le bouton Signaler un changement de langue permet de préciser une autre langue que celle par défaut sur une sélection de texte.
Dans un soucis d'accessibilité, cette fonctionnalité permet aux logiciels ou extensions qui lisent les contenus des pages web de changer de langue au moment de la lecture de la sélection de texte.
Pour signaler un changement de langue, après sélection du texte, vous cliquez sur le bouton et une fenêtre pop-up s'ouvre, permettant de définir le code de la langue, par exemple: "en" pour l'anglais
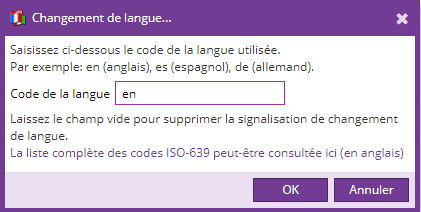
Consulter cette page http://xml.coverpages.org/iso639a.html pour voir la liste des codes des différentes langues.
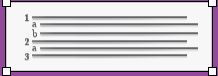
Listes
![]()
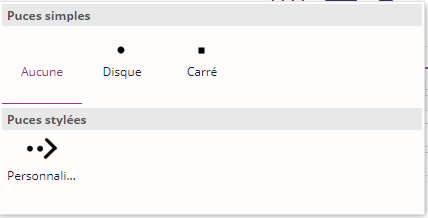
Sélectionner le contenu et cliquer sur le style de liste pour l'appliquer :
- Différents styles de puces :
- Différents styles de listes numérotées :
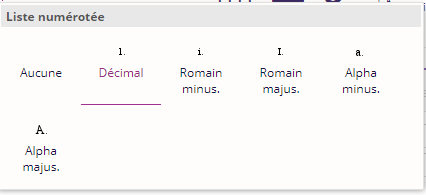
Il est possible d'augmenter et de diminuer le retrait en utilisant les boutons à droite des styles.
|
|
Diminue le retrait |
|
|
Augmente le retrait |
Les différents styles de listes disponibles peuvent varier car des styles personnalisés peuvent être définis par la charte graphique.
Zone "Insertion"

Cette zone permet d'insérer une multitude de composants du plus basique (un symbole) jusqu'aux plus complexes (formulaire, données fusionnées), sans oublier les fondamentaux : Tableau, Image, Lien etc...
Tableaux
La processus de création de tableau propose une interface intuitive à travers laquelle on renseigne le nombre de lignes et de colonnes désirées.
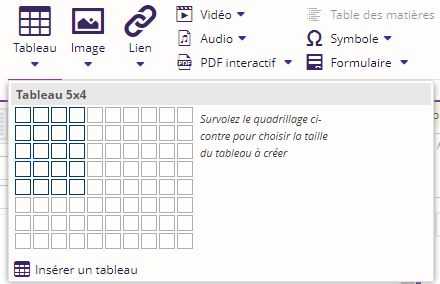
La copie d'écran à gauche illustre le cas de création d'un tableau à 3 lignes et 7 colonnes.
Pour insérer un grand tableau (dont la taille dépasse 8 lignes ou 10 colonnes), il suffit de cliquer sur la mention Insérer un tableau.. (mise en évidence dans le rectangle rouge) où il vous sera demandé de spécifier le nombre de lignes et de colonnes à afficher.
Après avoir créé un tableau ou lors de l'édition de celui-ci, un nouvel onglet contextuel Outils de tableau s'affiche dans la partie supérieure du ribbon (bandeau du haut).
Deux nouveaux sous-onglets sont alors disponibles :
- Tableau, pour les propriétés et opérations de bases.
- Avancé, concerne les fonctionnalités avancées
Propriétés du tableau

L'onglet Tableau onglet permet :
- La gestion des styles (voir ci-dessous)
- La gestion des ligne et colonne d'entête
- L'affichage du quadrillage (pour les tableaux sans bordure)
- L'ajout et la suppression de ligne/colonne
- La suppression du tableau
- De renseigner les propriétés Légende et Résumé
- De gérer l'alignement individuel des cellules (vertical et horizontal)
Styles des tableaux
Les styles sont dans l'onglet Tableau. Cliquez sur le bouton Styles et sélectionnez le style de votre choix. Ici le style Foncé est sélectionné.
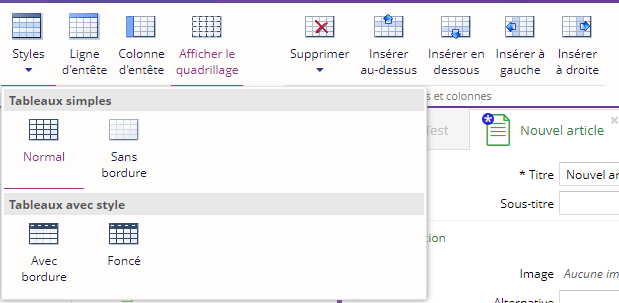
Les différents styles de tableaux disponibles peuvent varier car des styles personnalisés peuvent être définis par la charte graphique.
Fonctionnalités avancées
Les paramètres du tableau (taille, cellules, fusion et séparation des cellules, alignement) sont gérés dans l'onglet Avancé :

Cet onglet permet de :
- Fusionner / fractionner des cellules
- Sélectionner la méthode d'ajustement (automatique au contenu / automatique à la page / colonnes fixes)
- Définir la taille des colonnes / cellules
- Sélectionner l'habillage (politique d'alignement du texte avec le tableau)
Images
Les formats d'images autorisés sont : jpeg, gif, png, ...

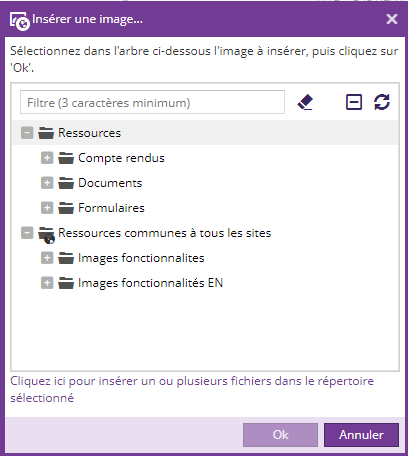
Deux types d'images peuvent être insérés dans un contenu.
- Choisir Image locale pour sélectionner une image située sur votre disque dur.
- Choisir Image partagée pour sélectionner une image parmi la liste des images de l'explorateur de ressources
Sélectionner votre image et valider.
Insérer une image partagée
Propriétés et styles des images
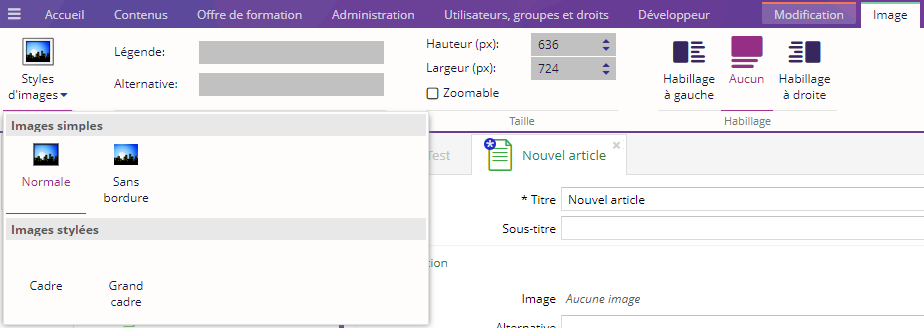
En cliquant sur l'image, l'onglet Image apparaît dans la barre du haut; il est donc possible d'éditer différents paramètres :
- On peut assigner différents styles à l'image :
- Normal
- Sans bordure
- Cadre
- Grand cadre
- Une légende et une alternative peuvent être spécifiées
- L'image peut être retaillée en saisissant la hauteur et la largeur (les proportions sont gardées)
- L'image peut être zoomable, ainsi elle devient cliquable afin de l'afficher en grande taille
- L'habillage du texte peut être défini :
- à gauche
- aucun
- à droite
Plus d'informations sur l'insertion et le paramétrage des images sur la page Insérer une photo ou une image rubrique Insertion d'une photo.
Les différents styles d'images disponibles peuvent varier car des styles personnalisés peuvent être définis par la charte graphique.
Ametys retaille l'image à insérer. Il n'est pas gênant d'envoyer de grosses images.
Un gif animé perdra son animation si il est redimensionné. Il est bon de noter que de toute façon un gif animé n'est pas accessible.
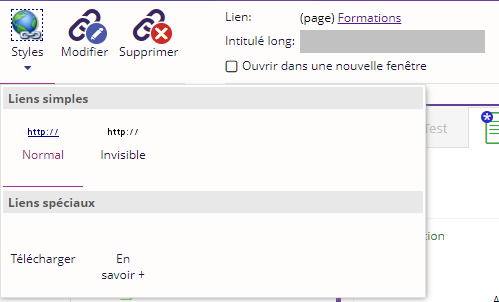
Liens
Lien vers une page d'Ametys
Il suffit de sélectionner la page à travers la vue du Plan du site
Le lien vers la page apparaîtra sans style.
Les liens de ce type sont robustes c'est-à-dire qu'ils seront automatiquement mis à jour lorsque la page pointée est déplacée ou renommée.
Seule la suppression de la page pointée laissera un lien référençant une page non existante. Dans ce cas, il conviendra de mettre à jour votre contenu en supprimant ce lien.
Pensez donc à utiliser l'outil des Liens cassés, notamment en étant attentif au rapport automatique des liens cassés.
Lien vers une page externe
Il faut renseigner l'adresse web de la page cible.
Le style par défaut de ce lien est une flèche qui part d'une fenêtre.
Lien vers une adresse e-mail
Il faut renseigner l'adresse e-mail cible.
Le style par défaut de ce lien est un enveloppe blanche.
Lien vers un numéro de téléphone
Il faut renseigner le numéro de téléphone cible.
Le style par défaut de ce lien est un téléphone.
Lien vers un fichier à télécharger
Cela permet de faire un lien vers un fichier appartenant au contenu en cours et ne pourra pas être utilisé ailleurs sur le site. Ce fichier est indexé avec le contenu.
Pour réaliser cette opération, sélectionner un fichier dans les pièces jointes du contenu. Il est possible d'ajouter un ou plusieurs nouveaux fichiers en cliquant sur "Cliquez ici pour insérer un ou plusieurs nouveaux fichiers dans le répertoire sélectionné".
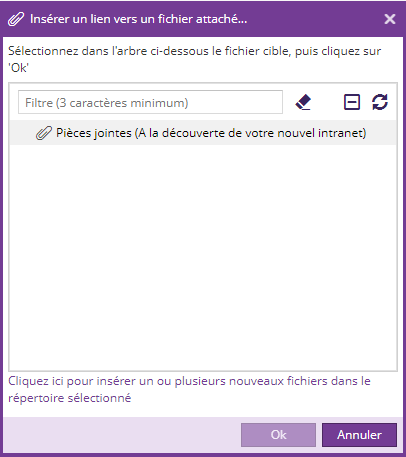
Le style par défaut de ce lien est une flèche bleue pointant vers le bas.
Lien vers un fichier partagé
Il est possible d'ajouter un lien vers un fichier de l'explorateur de ressources
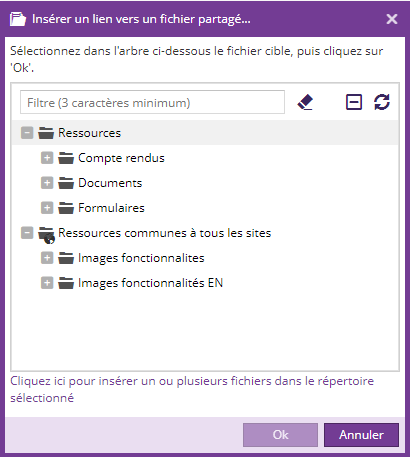
Il est possible d'ajouter directement un ou plusieurs fichiers dans l'explorateur de ressources en cliquant sur la mention Cliquez ici pour insérer un ou plusieurs fichiers dans le répertoire sélectionné.
Le style par défaut de ce lien est une flèche bleue pointant vers le bas.
Pour vous aider à choisir la meilleure méthode, il suffit de répondre à la question :
est-ce que le document PDF est un document général pouvant être utilisé à plusieurs endroits sur le site?
Si oui, utiliser un "lien vers un fichier partagé", sinon utiliser un "lien vers un fichier à télécharger"
Lien vers un fichier de projet
Ce lien est disponible à partir de la version 4.9
Il est possible d'ajouter un lien vers un fichier stocké dans les espaces projets.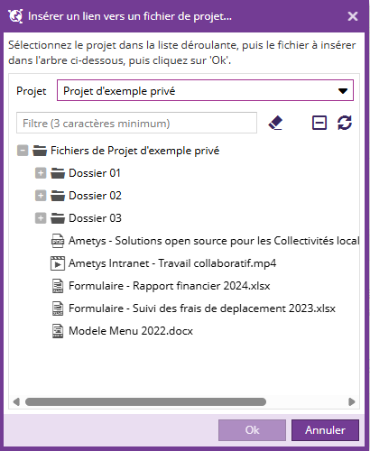
Propriétés et styles des liens
|
Quand on sélectionne le lien, un nouvel onglet apparaît, permettant de :
|
|
Vidéo externe
Les fonctionnalités décrites dans cette section (vidéo externe) font parties du Plugin Inline Média (installé par défaut dans l'application de démonstration Ametys).
Il est possible d'insérer une vidéo locale, une vidéo partagée, ainsi que vidéo YouTube ou Dailymotion.
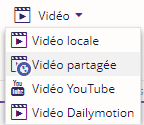
Plus d'informations sur la page Insérer une vidéo rubrique "Une video externe (YouTube ou Dailymotion)".
Table des matières
Il est possible d'ajouter un tel composant à l'aide du bouton dédié. La Table des matières sera automatiquement calculée selon les niveaux de titre du contenu.
|
|
|
|
La table des matières est représentée par l'image ci-dessus lors de l'édition du contenu. |
Exemple de rendu dans une page. |

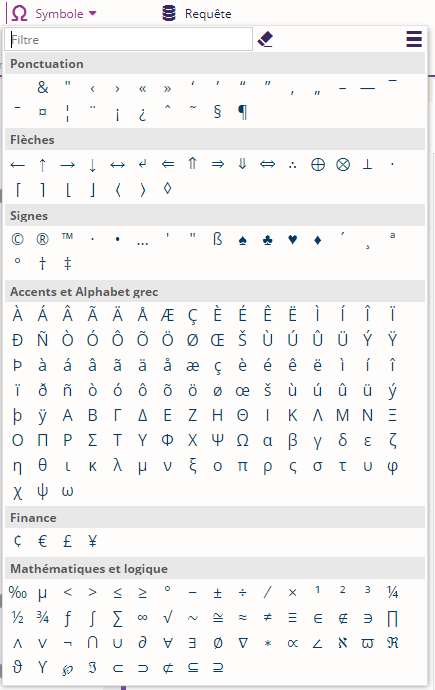
Symboles
Des caractères spéciaux peuvent être ajoutés au contenu via la fenêtre Symbole.
Formulaire
Ce bouton permet d'insérer un formulaire web pour vos visiteurs. Le formulaire peut vous être envoyé par email ou stocké dans Ametys pour un traitement ultérieur.
Retrouver toutes les informations sur la page Edition des formulaires.
Code HTML
Ce bouton permet d'insérer du code HTML dans le contenu. L'utilisation de cette fonctionnalité nécessite des connaissances HTML car ce code ne sera pas traité par Ametys mais utilisé directement.
Retrouver toutes les informations dans la page dediée à HTML Expert
Dernières publications
Cet outil se nomme ainsi car son cas d'utilisation typique est d'insérer des publications récentes lors de la rédaction d'une lettre d'information (newsletter) à envoyer aux abonnés.
Le titre est cependant trompeur car il est tout à fait possible d'ajouter n'importe quel contenu existant à l'aide de cette fonctionnalité.
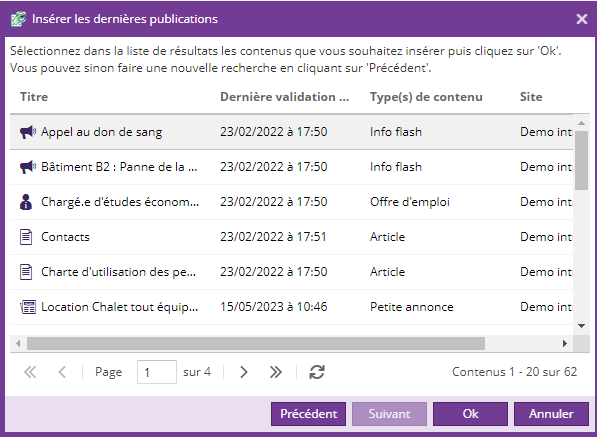
Les dernières publications (ou tout autre contenu) peuvent être insérées à ce champ riche :
|
|
|
|
Rechercher parmi les différents contenus |
Sélection des contenus à insérer |
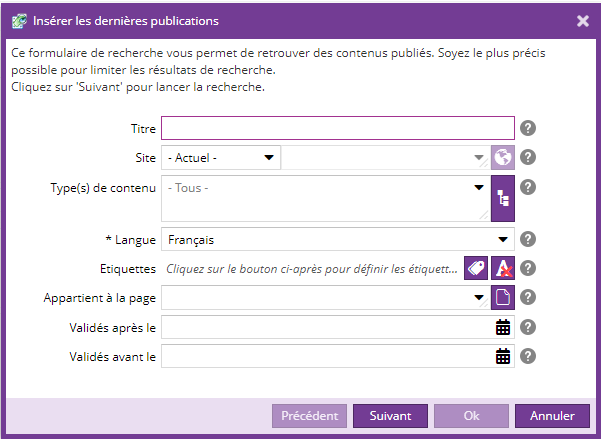
Le formulaire contient différents critères :
- Titre du contenu
- Le site contenant les publications
- Le type de contenu (obligatoire) : Article, Actualité, Galerie Photo, Newsletter...
- Date de validation (avant, après)
- Un choix d'étiquettes
- Une page
Ensuite une fenêtre de paramétrage vous demande de renseigner la vue et le niveau de titre (voir la précision ci-dessous) à utiliser pour l'insertion des contenus.
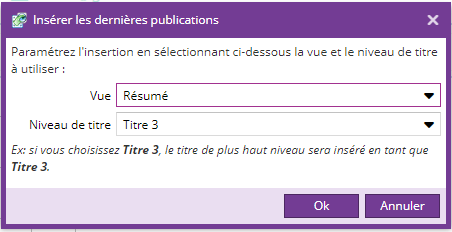
Les différentes vues possibles sont :
|
Résumé |
Affichage d'un résumé du contenu. Pour un article, le Titre puis le champ Entête sont affichés, suivis par un lien pointant vers la page du contenu. |
|
Lien |
Affichage d'un lien vers le contenu. Le nom du lien correspond au Titre du contenu. |
|
Complète |
Affichage du contenu dans son entièreté. |
Cette liste peut varier en fonction des types de contenus sélectionnés.
Précision à propos du paramètre Niveau de titre
Si vous choisissez Titre 3, le titre de plus haut niveau sera inséré en tant que Titre 3, signifie que :
- Tous les Titre 1 des contenus insérés, seront vus comme des Titre 3 dans le contenu courant.
- De même tous les Titre 2 des contenus insérés, seront des Titre 4 dans le contenu courant.
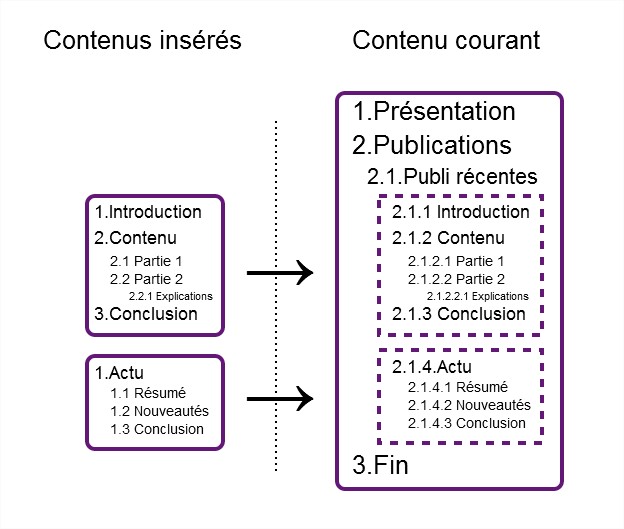
|
Schéma illustratif : Deux contenus sont insérés avec un Niveau de titre 3 |
|
|
Inclusion de données (requêtes)
Les fonctionnalités décrites dans cette section font partie du Plugin Insertion de données (installé par défaut dans l'application de démonstration Ametys).