- Cycle de vie commun
- Modifier le cycle de vie
- Historique
- Suppression de l'offre de formation
- Enlever un élément
Les contenus des éléments de l'offre de formation possèdent un cycle de vie.
Cycle de vie commun
Le cycle de vie par défaut de la plupart des contenus est le suivant :

Tous les contenus créés sont à l'état de brouillon.
Après l'édition, le contributeur peut faire une proposition pour ce contenu, il apparaîtra alors dans l'état proposé.
Dans la brique ODF, l'état proposé est disponible que pour l'entrée de la formation et les éléments pédagogiques.
Les autres éléments de la formation (parcours, conteneur et liste d'ELP) n'ont pas l'état de proposition.
Les personnes possédant les droits de validation sur ce contenu seront alors averties par mail de la proposition et pourront le valider.
Une fois validé, le contenu sera visible sur le site dans les pages le référençant. On dit aussi de ce contenu qu'il est publié.
Il est possible en fonction de vos droits de faire une validation globale de la formation, ce qui permettra de valider tous les contenus de sa structure.
Un contenu validé subissant des modifications sera mis dans l'état brouillon. Cependant seule la dernière version validée du contenu sera visible sur le site.
Pour que le contenu récemment modifié soit mis en ligne (publié) il faut qu'il soit à nouveau proposé, puis validé ou validé globalement.
Le cycle de vie peut être modifié lors des spécifications et de la mise en place de l'application.
En général il est composé des états "Brouillon, Proposé, Validé" mais ce n'est pas obligatoire.
L'ensemble des droits que possède chacun des utilisateurs peut proposer plus d'options que ce qui est présenté ici. Dans l'application de démonstration, un administrateur peut par exemple refuser un contenu proposé, valider directement un contenu dans l'état brouillon, archiver ou dé-publier un contenu, etc...
La dépublication consiste à retirer un flag positionné sur une version du contenu, indiquant que cette version est la dernière qui a été publiée. A noter que l'action de dépublier peut être réalisé même si le contenu n'est pas dans l'état Validé.
Dans l'ODF, vous ne pouvez dépublier que le point d'entrée de la formation.
Les éléments liés à la formation seront automatiquement dépubliés.
Modifier le cycle de vie
La première étape consiste à trouver un contenu, une formation ou un élément de la formation (parcours, conteneur, liste d'ELP, ELP) pour lequel nous souhaitons changer l'état.
Une méthode simple pour réaliser cette opération est d'aller chercher la page référençant le contenu, la formation ou un élément de la formation.
Pour trouver la page référençant un Contenu, une Formation, un Parcours, un Conteneur, une Liste d'ELP ou un ELP, veuillez vous référer à la rubrique trouver, localiser une page ou à la rubrique maquette de la formation.
Il est possible de changer l'état d'un Contenu directement après avoir sélectionné une page, ou depuis le moteur de recherche du back-office, ou depuis le tableau de bord.
Il est possible de changer l'état d'une Formation ou d'un Parcours directement après avoir sélectionné une page par le plan du site, ou depuis la maquette de formation, ou depuis le moteur de recherche de l'ODF du back-office, ou depuis le tableau de bord des formations.
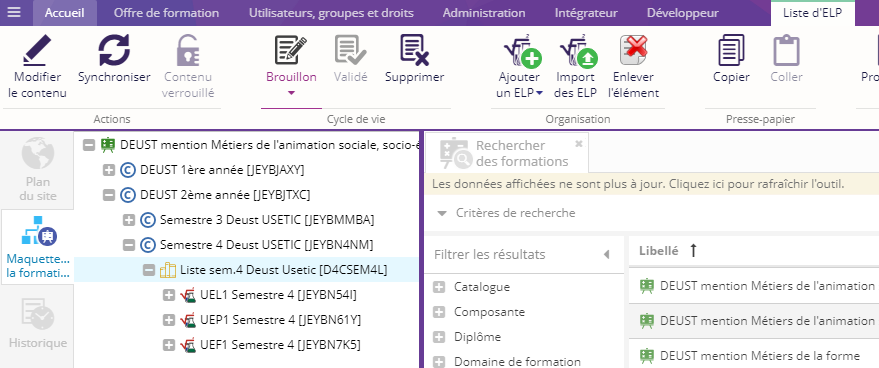
Pour modifier l'état des éléments Conteneur et Liste d'ELP, vous ne pouvez les changer que par la maquette de la formation car ses éléments ne sont rattachés à aucune page.
Il est possible de changer l'état d'un ELP après avoir sélectionné une page par le plan du site, ou depuis la maquette de formation, ou depuis le moteur de recherche des ELP du back-office, ou depuis le tableau de bord des ELP.
Sélectionnez un élément de l'offre de formation pour voir son état courant.
L'état courant de l'élément sélectionné est affiché soit dans l'onglet Contenu, Formation, Parcours, Conteneur, Liste d'ELP ou Enseignement pédagogie, dans la partie Cycle de vie.
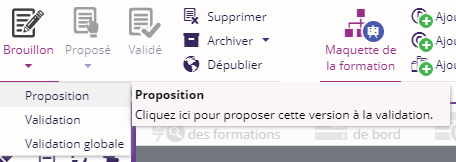
Pour modifier le cycle de vie, il vous suffit de cliquer sur la flèche en dessous de l'icône active et de choisir l'action choisie, par exemple "Proposition".
Pour mettre en ligne un contenu, il faut être arrivé dans l'état Validé.
Lorsque vous avez une différence entre la version Live (équivalente à la version site) et la version que vous visualisez dans le back-office. Cela signifie que le contenu ou un élément de la formation n'est pas validé et qu'il existe une version précédente de ce contenu qui a été validée.
La version Live affiche la dernière version du contenu validé (voir la section Historique ci-dessous).
Il est possible de modifier l'état de plusieurs contenus, formations ou ELP en même temps.
- Par exemple pour les contenus, allez dans le moteur de recherche du back-office (onglet Accueil), sélectionnez plusieurs contenus à l'aide de la touche CTRL + clic de la souris ou de la touche SHIFT + clic, puis modifiez l'état à l'aide des boutons.
- Par exemple pour les formations, allez dans le moteur de recherche de la formation du back-office (onglet offre de formation) sélectionnez plusieurs formations à l'aide de la touche CTRL + clic de la souris ou de la touche SHIFT + clic, puis modifiez l'état à l'aide des boutons.
- Par exemple pour les ELP, allez dans le moteur de recherche des ELP du back-office (onglet offre de formation) sélectionnez plusieurs ELP à l'aide de la touche CTRL + clic de la souris ou de la touche SHIFT + clic, puis modifiez l'état à l'aide des boutons.
Historique
Tous les contenus y compris l'ODF disposent d'un outil nommé Historique et permettant de représenter la succession des états du cycle de vie du contenu (cette succession d'étapes est couramment appelée workflow).

L'illustration ci-dessus affiche l'historique d'un ELP. L'état le plus récent est affiché en haut.
On en conclut que ce contenu est actuellement en attente de validation.
Suppression de l'offre de formation
Supprimer une Formation, un Parcours ou un Conteneur
Pour supprimer une Formation, un Parcours, ou un Conteneur vous devez aller chercher la page les référençant.
Pour trouver la page référençant une Formation, un Parcours, un Conteneur, veuillez vous référer à la rubrique trouver, localiser une page ou à la rubrique maquette de la formation.
Il est possible de supprimer une Formation ou un Parcours directement après avoir sélectionné une page par le plan du site, ou depuis la maquette de formation, ou depuis le moteur de recherche de l'ODF du back-office, ou depuis le tableau de bord des formations.
Pour supprimer un Conteneur, vous ne pouvez le supprimer que par la maquette de la formation car l'élément n'est rattaché à aucune page.
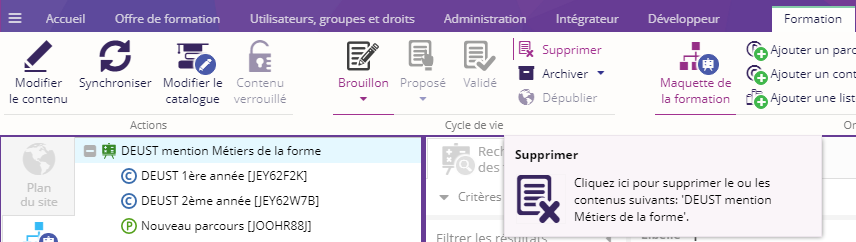
Sélectionnez la formation, le parcours ou le conteneur, puis allez dans l'onglet (Formation, Parcours, Conteneur), et cliquez sur le bouton Supprimer qui se situe dans la partie Cycle de vie.
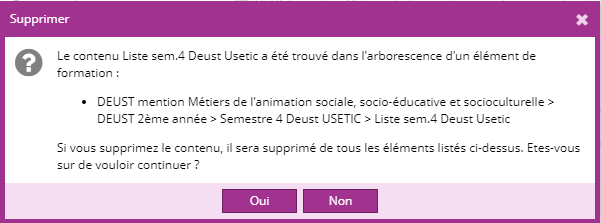
Si l'élément que vous avez sélectionné est partagé avec d'autres formations, un message vous avertira que l'élément que vous souhaitez supprimer, sera également supprimé des autres formations.
(voir l'exemple ci-dessous)
Si l'élément en cours de suppression n'a pas de sous-élément il sera supprimé définitivement de toutes les formations à la validation de celui-ci.
Par contre si cet élément à des sous-éléments une fenêtre de dialogue s'ouvrira avec différents choix de suppression.
Les choix de suppression sont identiques pour la formation, le parcours et le conteneur.
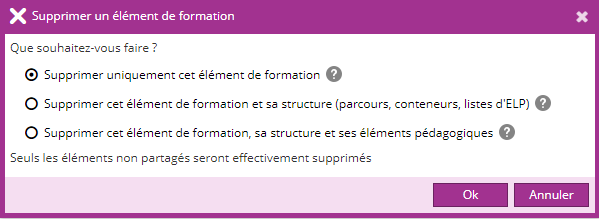
Choix des différentes suppressions :
- Supprimer uniquement cet élément de formation : ce choix permet de supprimer seulement l'élément que vous avez sélectionné.
- Supprimer cet élément de formation et sa structure (parcours, conteneurs, listes d'ELP) : ce choix supprime tous les sous-éléments (sauf les ELP) non partagés de cette formation et lui-même seront supprimés.
- Supprimer cet élément de formation, sa structure et ses éléments pédagogiques : ce choix supprime tous les sous-éléments non partagés de cet élément de formation et lui-même seront supprimés.
Pour les différentes suppressions, seuls les éléments non partagés seront supprimés.
Supprimer une liste d'ELP ou un ELP
Pour supprimer une liste d'ELP ou un ELP vous devez aller chercher la page les référençant.
Pour trouver la page référençant une liste d'ELP ou un ELP, veuillez vous référer à la rubrique trouver, localiser une page ou à la rubrique maquette de la formation.
Pour supprimer l'état d'une liste d'ELP, vous ne pouvez la supprimer que par la maquette de la formation car ses éléments ne sont rattachés à aucune page.
Il est possible de supprimer un ELP après avoir sélectionné une page par le plan du site, ou depuis la maquette de formation, ou depuis le moteur de recherche des ELP du back-office, ou depuis le tableau de bord des ELP.
Sélectionnez une liste d'ELP ou un ELP puis allez dans l'onglet (Liste d'ELP, Élément pédagogique ), et cliquez sur le bouton Supprimer qui se situe dans la partie Cycle de vie.
Si l'élément que vous avez sélectionné (liste d'ELP ou EPL) est partagé avec d'autres formations, un message vous avertira que l'élément que vous souhaitez supprimer, sera également supprimé des autres formations.
(voir l'exemple ci-dessous)
Si l'élément liste d'ELP ou ELP en cours de suppression n'a pas de sous-élément, il sera supprimé définitivement de toutes les formations à la validation de celui-ci.
Par contre si cet élément à des sous-éléments une fenêtre de dialogue s'ouvrira avec différents choix de suppression.
Voici les choix de suppressions pour une liste d’éléments pédagogiques.
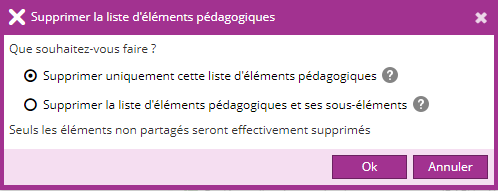
Choix des différentes suppressions :
- Supprimer uniquement cette liste d'éléments pédagogiques : ce choix permet de supprimer seulement cet liste d'éléments pédagogiques.
- Supprimer la liste d'éléments pédagogiques et ses-sous éléments : ce choix supprime tous les sous-éléments non partagés de cette liste d'éléments pédagogiques et elle-même seront supprimés.
Pour les différentes suppressions, seuls les éléments non partagés seront supprimés.
Les choix de suppressions pour un élément pédagogique:
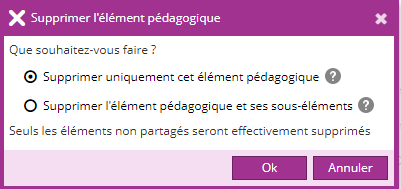
- Supprimer uniquement cet élément pédagogique : ce choix permet de supprimer seulement l'élément pédagogique.
- Supprimer l'élément pédagogique et ses-sous éléments : ce choix supprime tous les sous-éléments non partagés de cet élément pédagogique et lui-même seront supprimés.
Pour les différentes suppressions, seuls les éléments non partagés seront supprimés.
Enlever un élément
Si vous ne voulez pas supprimer un Parcours, un Conteneur, une Liste d'ELP ou un ELP d'une formation, il est possible d'enlever un de ces éléments.
Pour cela il vous suffit de sélectionner un Parcours, un Conteneur, une Liste d'ELP ou un ELP en retrouvant l’élément.
Pour trouver la page référençant un parcours, un conteneur, une liste d'ELP ou un ELP, veuillez-vous référer à la rubrique maquette de la formation.
Il est possible d’enlever un Parcours depuis la maquette de formation ou depuis le tableau de bord des formations.
Pour enlever un Conteneur et une liste d'ELP, vous ne pouvez les changer que par la maquette de la formation.
Il est possible d’enlever un ELP depuis la maquette de formation, ou depuis le moteur de recherche des ELP du back-office.
Sélectionnez un élément (Parcours, Conteneur, liste d’ELP ou ELP) d’une formation, allez dans l’onglet (Parcours, Conteneur, Liste d'ELP, Enseignement pédagogie), et cliquez sur le bouton Enlever l’élément.

Si vous enlevez un élément, vous pouvez le réutiliser en utilisant les boutons Rechercher un Conteneur, Rechercher un Parcours, Rechercher une liste ELP et Rechercher un ELP.